1. Introduction
PostgreSQL is packed with several security features for a database administrator to utilize according to his or her organizational security needs. The word Security is a very broad concept and could refer to completely different procedures and methodology to achieve in different PostgreSQL components. This blog is divided into part 1, 2 and 3 and I will explain the word Security with regards to PostgreSQL version 12.1 and how it is practiced in different areas within the system.
In Part 1 of the blog, I will be discussing the basic security features that exist in PostgreSQL with emphasis on Host-based authentication methods as well as user-based access control with the concept of roles. If done right, we could have a much more robust database server and potentially reduce the attack surface on the server, protecting it from attacks like SQL injections. I will also briefly discuss a few of the advanced authentication methods such as LDAP and PAM authentication. There are many more advanced authentication methods supported and we will be producing more articles in the near future to cover more of these methods.
In Part 2 of the blog, I will be discussing TLS in greater detail, which I believe is crucial for a database administrator to understand first before enabling TLS in the PostgreSQL server. TLS is a fairly large and one of the least understood protocol today, which contains a lot of security components and methodology related to cryptography that could be quite confusing.
In Part 3 of the blog, I will be discussing how to apply TLS configurations to both PostgreSQL server and client following the TLS principles that have been discussed in Part 2. I will also briefly discuss Transparent Data Encryption (TDE) that the PG community is currently working on that introduces another layer of secured database environment.
Below is the overview of the security topics that will be covered in all parts of the blog:
Part 1:
- PostgreSQL Server Listen Address
- Host-Based Authentication
- Authentication with LDAP Server
- Authentication with PAM
- Role-Based Access Control
- Assign Table and Column Level Privileges to Users
- Assign User Level Privileges as Roles
- Assign and Column Level Privileges via Roles
- Role Inheritance
Part 2:
- Security Concepts around TLS
- Symmetrical Encryption
- Asymmetrical Encryption (a.k.a Public Key Cryptography)
- Block Cipher Mode of Operation (a.k.a Stream Cipher)
- Key Exchange Algorithm
- TLS Certificate and Chain of Trust
- Data Integrity Check / Data Authentication
- TLS Cipher Suite and TLS handshake
- TLS versions
Part 3:
- Preparing TLS Certificates
- Enabling Transport Layer Security (TLS) to PostgreSQL Server
- Enabling Transport Layer Security (TLS) to PostgreSQL Client
- TLS Connect Examples
- Transparent Data Encryption (TDE)
- Security Vulnerability
2. PostgreSQL Server Listen Address
PostgreSQL server is a TCP server that by default listens on localhost at port 5432. The server listen address may seem very trivial at first in terms of security but it is actually very important because understanding how the PostgreSQL is serving the incoming connections is fundamental to building a more secured network environment.
Connection settings are located in postgresql.conf
The listen_addresses parameter tells PostgreSQL which addresses to listen on. This value should match the IP address of the network interface cards in the host machine. ifconfig on Unix-based systems (or ipconfig for Windows) is a handy command that lists all the network interfaces and their IP addresses. listen_address supports the less secured * configuration, which will listen to all the network interfaces available
#listen_addresses = 'localhost' # what IP address(es) to listen on; |
Another important connection configuration is the maximum connections allowed. By default PostgreSQL allows 100 simultaneous connections to be active at a time with 3 connections reserved for super user. That is 97 connections for regular database users. These numbers should be configured accordingly depending on the usage case of the database server and we definitely don’t want too many unintentional connections to access the database
max_connections = 100 # (change requires restart) |
3. Host-Based Authentication
Host-based authentication refers to the process of verifying the identity of a user connection based on the IP addresses of the connecting host. PostgreSQL supports host-based authentication by adding and removing desired entries in the pg_hba.conf file. This file works in a similar way as defining firewall rules. The official documentation on pg_hba.conf can be found here: https://www.postgresql.org/docs/current/auth-pg-hba-conf.html
A simple example below defines the following rules:
- Allows connections from subnet 192.168.3.0/24 to access the database named “software_team”
- Allows connections from subnet 192.168.4.0/24 to access the database named “marketing_team”
- Allows connections from subnet 192.168.5.0/24 to access the database named “sales_team”
- Allows connections from subnet 192.168.6.0/24 to access the database named “management”
- The admin user has permission to access all the database given that the admin is connecting from localhost (both IPv4 and IPv6) or from a UNIX domain socket.
- Allows all user connections coming from subnet 192.168.7.0/24 to access the database named “production_team” and is able to do replication connection. Please note that the word “replication” is a special term reserved to allow replication connections rather than database name.
- Allows user from a unsecured network “172.16.30.0/24” to access the “sales_team” database only if the connection uses SSL (a.k.a TLS)
- Rejects all connections from 172.16.50.5
|
The simple example above uses 2 basic methods to control the access, trust and reject. This will suffice in a small database server environment. However, depending on the infrastructure, the application’s nature and data security, stronger authentication methods are encouraged, such as LDAP, GSSPI with Kerberos, SSPI, RADIUS SCRAM-SHA-256…etc.
Generally speaking, most of these stronger authentication methods require PostgreSQL to communicate with foreign authentication servers to complete the authentication process in a more secured way and provide automatic “single-sign-on” authentications through means of shared secrets, token exchange, or user name mappings. I will briefly introduces LDAP and PAM authentication in this blog.
4. Authentication with LDAP Server
LDAP stands for Light-weight Directory Access Protocol, which is commonly deployed as centralized authentication system for medium to large organizations. This authentication server provides user credential authentication and stores related user details like distinguished name, domain names and business units..etc. Every entry in an LDAP directory server has a distinguished name (DN). It is the name that uniquely identifies an entry in the directory and made up of attribute=value pairs. As a LDAP client on the PostgreSQL side, attribute=value pairs are required to be supplied in pg_hba.conf file separated by commas. For example:
# TYPE DATABASE USER ADDRESS METHOD |
Please note that LDAP by default is not encrypted and communicating user credential unencrypted is never a good idea. LDAP over TLS is supported by appending ldaptls=1 to the ldap attributes in pg_hba.conf file. Please also note that ldaptls=1 only provides secured connection between PostgreSQL server and LDAP server. The connection between PostgreSQL server and client is not using TLS by default, so it needs to be enabled as well. TLS is discussed in details in part 2 of this blog.
5. Authentication with PAM
PAM stands for Pluggable Authentication Module and it operates similarly to password. The default service name is postgresql. First we need to create a linux user (Example based on Ubuntu 18.04).
$ useradd production_user |
Create /etc/pam.d/postgresql with the content:
#%PAM-1.0 |
Create production_user in PostgreSQL server
$ CREATE USER production_user; |
Then finally update the pg_hba.conf with pam authentication method.
# TYPE DATABASE USER ADDRESS METHOD |
6. Authentication with Certificate
Authentication with certificate can be applied to all the authentication methods by appending clientcert=1 in method parameters. This is only useful with hostssl type records in pg_hba.conf file and requires that the PostgreSQL server has TLS enabled in postgresql.conf with path to CA certificate specified. We will discuss TLS and certificates in part 2 of the blog in more details.
With clientcert=1 in place, the server will require that the client to send its TLS certificate for verification. The connection will abort if client fails to provide a certificate. The server will verify the common name (CN) in the certificate against the server’s hostname. Both should match. In addition, certificate validity dates will be verified and most importantly, the server will try to determine the chain of trust from the client certificate against the CA certificate configured in the server to determine if the client can be trusted.
# TYPE DATABASE USER ADDRESS METHOD |
7. Role-Based Access Control
Role-based access control refers to the process of verifying database access permissions based on the pre-defined roles and user privileges. PostgreSQL supports role-based access in several levels, such as table, function, procedural language and user levels. I will explain the concept in table and user level access control that follow the general guidelines below:
- A user with super user privilege can do any activities in the database
- A user who creates a table owns the table and can set its permission
- A user needs to belong to a proper role to perform administrative operations such as create another user or role
- Other users need proper permissions to view or operate on a table created by another user.
When a PostgreSQL database cluster has been initialized, a super user will be created by default that equals to the system user that initializes the cluster. This super user is the starting point to define other role and other users and privileges to ensure proper database access.
8. Assign Table and Column Level Privileges to Users
The GRANT clause supported in PostgreSQL is used to configure the access privileges (official documentation here: https://www.postgresql.org/docs/current/sql-grant.html). GRANT is a very universal clause that can be used to add access privileges to tables, databases, roles, table spaces…etc. The opposite of GRANT is REVOKE, which removes privileges (official documentation here: https://www.postgresql.org/docs/current/sql-revoke.html). In this blog, I will use GRANT on table and role level. When a table is created, it is assigned an owner. The owner is normally the user that executed the creation statement. The initial state is that only the owner (or a superuser) can do anything with the table. To allow other users to use it, privileges must be granted.
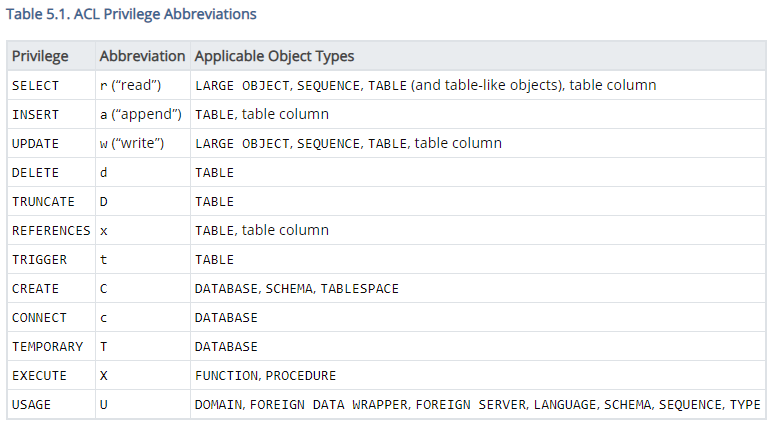
There are many types of privileges that can be granted to a table or a table column. The image below is taken directly from the official PostgreSQL documentation that lists all the available privileges and their applicable objects.
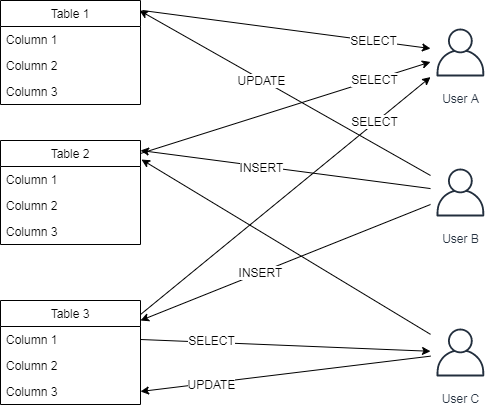
Consider a simple SQL command example below that assigns table and column access privileges to other users
$ GRANT SELECT ON table1 TO userA; |
The above SQL commands can be illustrated as:
9. Assign User Level Privileges as Roles
A ROLE is an entity that can own database objects and have database privileges; a role can be considered a “user”, a “group”, or both depending on how it is used.(official documentation here: https://www.postgresql.org/docs/current/sql-createrole.html). Similar to a table, a created role can be altered with the ALTER clause or deleted with the DROP clause.
Please note that when a role is created initially, the permission to LOGIN is not allowed by default and has to be manually set such that the users belonging to this role can log in to the database server. The same can be done with CREATE USER clause, which allows LOGIN by default. So the following 2 commands are essentially the same
$ CREATE ROLE username LOGIN; |
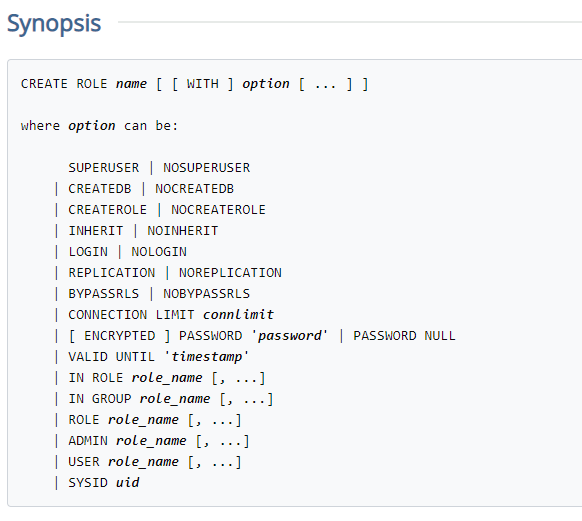
The following image is taken directly from the official PostgreSQL documentation that lists all the privilege keywords that can be associated to a role.
Consider the following simple example that creates 3 users and 4 different roles having different user level access privileges.
/* Create 3 users */ |
Use the \du+ meta command to see all the roles that have been created with summary of the attributes associated with each role. To see the full list of attributes per role, use the SQL command SELECT * FROM pg_roles;.
postgres=# \du+ |
10. Assign Table Level Privileges via Roles
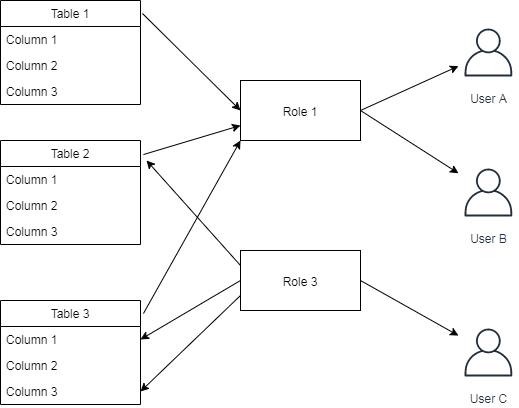
Section 3.1 illustrates privilege assignments directly to each individual users, which is desirable in smaller database servers. Imagine a larger database server where there could potentially be hundreds of users exist in the entire database cluster. Managing the table level privileges would get quite complicated and tedious. Luckily, PostgreSQL supports assigning users to roles for better privilege management
Following the examples in section 3.2, we can use the GRANT command again to assign users to roles. Note that the Member of will display the relationship between users and roles after we have related them with GRANT clause.
$ GRANT role1 TO userA; |
Following the examples in section 3.1, we can use the GRANT command again to assign table level privileges to roles that we have created instead of to users directly
$ GRANT SELECT ON table1 TO role1; |
The above SQL commands can be illustrated as:
11. Role Inheritance
INHERIT and NOINHERIT are one of the special attributes that can be assigned to a role. When a role (say role 1) contains INHERIT attribute and is a member of another role (say role 2). All the attributes existing in both role 1 and role 2 will be applied to the user.
Consider a simple example below:
$ CREATE ROLE role1 LOGIN CREATEDB REPLICATION; |
Which can be visualized as:

In this case, role2 is created with INHERIT, userA will be assigned the privileges defined in both role1 and role2.
12. Summary
In this blog, we went over several mechanisms in postgreSQL that allows a database administrator to configure the authentication of incoming user connections and the privilege configuration in table, column and user level via the concept of roles. PostgreSQL provides pg_hba.conf file that configures simple authentication and supports stronger authentication methods against remote authentication services such as GSSAPI, kerberos, RADIUS, PAM and LDAP..etc. So far we have only talked about authentication and authorization (AA) in PostgreSQL terms, in part 2 of this blog, I will explain the general concept of data encryption, how to secure data communication between server and client with TLS and how to achieve encryption on storage devices.

