1. Introduction
This is part 3 of the blog “Understanding Security Features in PostgreSQL”, in which I will be discussing how to apply TLS in both PostgreSQL server and client using the principles we have learned in part 2 of the blog. In the end, I will also briefly talk about Transparent Data Encryption (TDE) and security vulnerability.
Here is the overview of the security topics that will be covered in all parts of the blog:
Part 1:
- PostgreSQL Server Listen Address
- Host-Based Authentication
- Authentication with LDAP Server
- Authentication with PAM
- Role-Based Access Control
- Assign Table and Column Level Privileges to Users
- Assign User Level Privileges as Roles
- Assign and Column Level Privileges via Roles
- Role Inheritance
Part 2:
- Security Concepts around TLS
- Symmetrical Encryption
- Asymmetrical Encryption (a.k.a Public Key Cryptography)
- Block Cipher Mode of Operation (a.k.a Stream Cipher)
- Key Exchange Algorithm
- TLS Certificate and Chain of Trust
- Data Integrity Check / Data Authentication
- TLS Cipher Suite and TLS handshake
- TLS versions
Part 3:
- Preparing TLS Certificates
- Enabling Transport Layer Security (TLS) to PostgreSQL Server
- Enabling Transport Layer Security (TLS) to PostgreSQL Client
- TLS Connect Examples
- Transparent Data Encryption (TDE)
- Security Vulnerability
2. Preparing TLS Certificates
Before we can utilize TLS to secure both the server and the client, we must prepare a set of TLS certificates to ensure mutual trust. Normally the CA (Certificate Authority) certificates can be purchased from a trusted organization and used it to create more CA-Signed certificates for services and applications. In this section, I will show you how to create your own CA Certificate and CA-Signed certificates using OpenSSL command line tool for both PostgreSQL server and client.
You may also have heard the term self-signed certificate. This type of certificate is not signed by a trusted CA and is normally considered insecured in many applications. We will not go over the self-signed certificate generation in this blog.
2.1 Generate a Private Key for CA Certificate
Remember in last blog we mention that each certificate contains organization information and public key, which is paired with a private key file. Let’s generate a private key file for our CA first.
$ openssl genrsa -des3 -out cacert.key 2048 |
Your will be prompted with pass phrase, which is recommended to provide as it will prevent someone else from generating more root CA certificate from this key.
2.2 Generate CA Certificate Using the Private key
Now, let’s generate the CA Certificate with the private key
$ openssl req -x509 -new -nodes -key cacert.key -sha256 -days 3650 -out cacert.pem |
Please note that OpenSSL will prompt you to enter several pieces of organizational information that identifies the CA certificate. You should enter these information suited to your organization. The most important field is Common Name, which is commonly checked against the hostname or domain name of the service. Depending on the security policy, some server will enforce the rule that common name must equal its host / domain name; some servers do not have this restriction.
2.3 Generate a private key for CA-Signed certificate
Like in the CA case, CA-signed certificate is also paired with a private key file
$ openssl genrsa -out server.key 2048 |
2.4 Generate a Certificate Signing Request for CA-Signed certificate
Then we create a Certificate Signing Request (CSR), which contains a list of organizational information to be presented to the CA server for verification. The CA server then decide if the CSR should be granted a new certificate according to the security policy configured. Since we are using OpenSSL for certificate generation, the CA server here refers to OpenSSL itself, and the security policy configuration is located in openssl.cnf, which is commonly located in /usr/local/ssl/openssl.cnf. In an enterprise environment where Public Key Infrastructure (PKI) is deployed, the CA Server could refer to an actual service whose sole purpose is to verify incoming CSRs and renew or issue new certificates to requesting clients.
$ openssl req -new -key server.key -out server.csr |
2.5 Generate a CA-Signed certificate
Since we are generating CA-signed certificate with OpenSSL locally, we can configure how the certificate should be generated using openssl.cnf file. We will just be using the default policy set in openssl.cnf. Here’s a snapshot of the default settings:
[ usr_cert ] |
Let’s generate the CA-signed certificate. Note that the command will take cacert.pem, cacert.key and server.csr as inputs, in which we have already generated from previous steps. server.pem will be the output.
$ openssl x509 -req -in server.csr -CA cacert.pem -CAkey cacert.key -CAcreateserial -out server.pem -days 3650 -sha256 |
We can repeat from step 2.3 to 2.5 to generate a new pair for the client application.
To conclude, we have the following files generated:
- cacert.pem - Root CA certificate that is at the top of the chain of trust. We use it to sign and create other certificates
- cacert.key - key for the Root CA Certificate - must keep it secured.
- server.pem - CA-signed certificate for server application
- server.key - key for the server certificate
- client.pem - CA-signed certificate for client application
- client.key - key for the client certificate
3. Enabling Transport Layer Security (TLS) to PostgreSQL Server
PostgreSQL has native support for TLS to secure connection between client and server. The TLS support has to be enabled during build time and requires OpenSSL libraries. Depending on the versions of OpenSSL that the client or server is built with, TLS versions and ciphersuites may differ as well. This does not mean that both client and server must be linked with the same version of OpenSSL. It is possible that a client with older OpenSSL can connect to a server with newer OpenSSL if the server is configured to accept it. The TLS handshake process is initiated when a client first connects to the server in which they will evaluate TLS version used and negotiate ciphersuite that both ends are able to support. In this case, the server may use less secured ciphersuite and TLS version to communicate with the client, which may not be ideal.
The TLS support for a PostgreSQL server can be enabled in postgresql.conf.
ssl = on |
Let’s examine the configuration parameters.
ssl = on |
This line turns on the TLS support. Please note that even if TLS is turned on, the server will still be able to accept connections that do not use TLS. Normally, the client is the entity that decides if TLS should be used or not. The server can also enforce the incoming connections to use TLS by modifying the pg_hba.conf file like this, where the connections from 172.16.30.0/24 must be TLS, otherwise the server will deny.
hostssl sales_team all 172.16.30.0/24 trust |
ssl_ca_file = '~/cert/cacert.pem' |
These 4 lines tell PostgreSQL where to load the X509 certificate, the CA certificate, server private key and the certificate revocation list. These certificates must be pre-generated by OpenSSL command or purchased from a trusted organization. For TLS to work, ssl_ca_file, ssl_cert_file and ssl_key_file must be provided. We will use the certificates we have generated for server in the previous section.
The file pointed by ssl_ca_file will be used to determined if the certificate can be trusted by deriving the chain of trust.
The file pointed by ssl_cert_file will be sent to the connecting client during TLS handshake for authentication purposes.
The file pointed by ssl_key_file will be used for asymmetrical encryption during authentication
The file pointed by ssl_crl_file is optional and it contains a list of certificates that cannot be trusted (or revoked). Distributing revoked certificates using this file is not the most ideal but still being practice today. It may have performance impact if the list is very large and it introduces a problem of when the list should be renewed and how often. Online Certificate Status Protocol (OCSP. ref:https://en.wikipedia.org/wiki/Online_Certificate_Status_Protocol) is a newer protocol designed for Public Key Infrastructure (PKI) for querying certificate revocation status that addresses some of the issues with revocation file. Feel free to give a read on OCSP in the link above.
ssl_ciphers = 'HIGH:MEDIUM:+3DES:!aNULL' # allowed SSL ciphers |
During TLS handshake, both client and server will present to each other a list of desired ciphersuites ordered by preference. Handshake process will go through both lists and find a common ciphersuite supported by both sides or abort if there is nothing in common. The ssl_ciphers configuration is used to configure the size of the ciphersuite lists to be presented to the client during handshake.
ssl_ciphers is a string list consisting of one or more cipher strings separated by colons ( ref: https://www.openssl.org/docs/man1.1.1/man1/ciphers.html) and defaults to HIGH:MEDIUM:+3DES:!aNULL which translates to:
- allows high strength ciphersuites (HIGH)
- allows medium strength ciphersuites (MEDIUM)
- move any ciphersuite using 3DES algorithm to the end of the list (+3DES)
- remove any ciphersuite that does not have authentication algorithm (!aNULL)
For example, “HIGH:!ADH:!MD5:!RC4:!SRP:!PSK:!DSS:!ECDHE:!ECDSA:!EDH:!DH:!ECDH:!CAMELLIA256” will use high strength ciphersuites while removing any ciphersuites containing ADH, MD5, RC4…etc.
Before applying the cipher string to PostgreSQL, it is recommended to check the output cipher list after tuning the cipher string using Openssl client tool.
$ openssl ciphers -v 'HIGH:!ADH:!MD5:!RC4:!SRP:!PSK:!DSS:!ECDHE:!ECDSA:!EDH:!DH:!ECDH:!CAMELLIA256' |
ssl_prefer_server_ciphers specifies whether to use the server’s SSL cipher preferences, rather than the client’s. It should always be on for more control in terms of ciphersuite selection.
ssl_ecdh_curve specifies the name of the curve to use in ECDH key exchange algorithms and is useful only if the ciphersuite uses ECDHE key exchange algorithm. The most common curves are : prime256v1, secp384r1 and secp521r1 and normally leaving it default should suffice.
ssl_min_protocol_version = 'TLSv1.2' |
These 2 lines configure the minimum and maximum TLS versions to accept. By default the server will only serve the TLS client using TLSv1.2 and above. TLSv1.2 is a very secured TLS version and it is widely used in the world. Normally, we only change the minimum TLS version with assumption that all future versions will be more secured and for this reason, we normally don’t put restriction on the max version.
TLSv1.3 is recently introduced that has new ciphersuite support and has more improvement in the handshake process. To enforce TLSv1.3 to be used, set the ssl_min_protocol_version to ‘TLSv1.3’ will suffice.
ssl_dh_params_file = '' |
ssl_dh_params_file points to a file that contains custom diffie-hellman key exchange algorithm parameter. This is an optional parameter and is only useful if the ciphersuite uses DHE key exchange algorithm. If left empty, compiled-in defaults will be used. Custom DH parameters can be generated using command openssl dhparam -out dhparams.pem 2048 and will normally reduce the attack exposure as attacker will have hard time cracking the key exchange process using custom parameter instead of the well-known default.
ssl_passphrase_command is the command to obtain the password for the private key file specified by ssl_key_file. There is an option to add a password to a private key file during its generation and if password is used, ssl_passphrase_command must be set with the system command that will retrieve such password. Otherwise, TLS handshake will abort as PostgreSQL will not be able to access private key without password.
ssl_passphrase_command_supports_reload configures if the ssl_passphrase_command should be re-run at every reload (ie. SIGHUP). It is default to off, so the ssl_passphrase_command will not be run at every reload.
4. Enabling Transport Layer Security (TLS) to PostgreSQL Client
Now that we have a PostgreSQL server with TLS setup, we can use psql client to connect to the server also using TLS. Depending on the client connect parameters given, we can utilize TLS in different security levels. I will show the most common usages here:
# Case 1: connect to server in TLS mode |
The usage in Case 4 is the most secured because both server and client will verify each other’s certificate and decide if both can be mutually trusted. The common name field in the certificate is checked against the server hostname; certificate validity period is checked, organization details are checked; certificate trust chain is checked; revocation list is checked.
Please note that PostgreSQL server with TLS enabled by default does not force the client to present a TLS certificate for verification. If client presents one like in Case 4 above, the server will verify and deny connection is certificate is bad. If client does not provide a certificate like in Case 1 ~ 3, the server will skip the client certificate verification as there is nothing to verify, which is less secure.
To enforce the connecting client to present a TLS certificate for verification, we will need to add a special clientcert=1 argument in existing authentication rules defined in pg_hba.conf.
# TYPE DATABASE USER ADDRESS METHOD |
The example above will enforce connecting client to present TLS certificate to access production_team database as production_user. If a TLS certificate is not provided by client, the connection will abort.
5. TLS Connect Examples
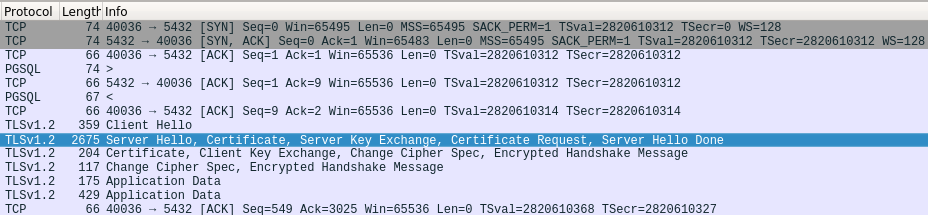
$ psql -U user -h localhost -d "sslmode=require dbname=postgres" |
Please note that psql prints the TLS version used (TLSv1.2) and the cipher suite negotiated during handshake (ECDHE-RSA-AES256-GCM-SHA384). Below is the wireshark capture of the above TLS connection:

Another Example:
$ psql -U cary -h localhost -d "sslmode=verify-full dbname=postgres sslrootcert=~/cert/cacert.pem sslcert=~/cert/client.pem sslkey=~/cert/client.key" |
Here, we have an error when we set sslmode to verify-full, where both server and client will verify each other with the most strict criteria. This error happens because the Common Name field in the certificate does not match the host name. Did I mention that Common Name is the most important field of a certificate? To resolve this error, we can either re-generate certificate with matching Common name, or change the host name.
I simply add an entry to /etc/hosts to resolve the error
127.0.0.1 localhost |
and the error will disappear when both Common Name and Hostname match
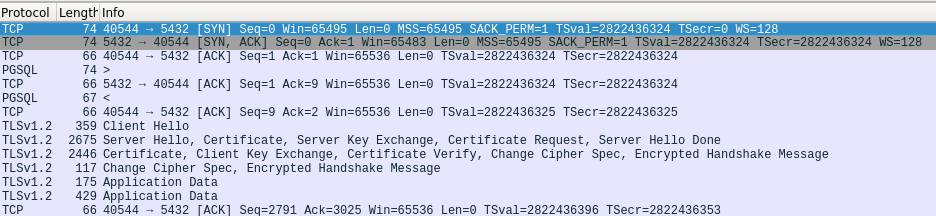
$ psql -U cary -h va.highgo.ca -d "sslmode=verify-full dbname=postgres sslrootcert=~/cert/cacert.pem sslcert=~/cert/client.pem sslkey=~/cert/client.key" |
Please note that this command also forces the client to submit a certificate to server as well as seen from the wireshark capture. We can tell by looking at the length field of the packet capture. There are 2 exchanges having lengths = 2675 and 2446. Those are the actual certificate contents being transmitted. Previous capture only has 1 exchanges having packet length = 2675; it means only server is providing certificate to client for verification.
6. Transparent Data Encryption (TDE)
Transparent Data Encryption refers to the process of protecting data at rest by encrypting database files on the hard disk level and decrypting them while reading from hard disk. This is to prevent physical storage media theft. This is called transparent because the encryption and decryption happen between PostgreSQL server and the physical hard disk and it is not visible to the client applications. TDE uses symmetrical encryption for securing blocks of database files such as shared buffer and WAL files, and it is designed to accompany with a internal Key Management System (KMS) to manage the lifecycle of the encryption keys.
TDE and KMS are still under development by the PostgreSQL community. The KMS feature is expected to be released in PG13 while the TDE feature to be in PG14. With its completion, it will add another layer of security feature on top of already security-rich PostgreSQL database.
7. Security Vulnerability
Security Vulnerability is a weakness which can be exploited by an attacker to perform unauthorized actions, sabotage a service, or inject malicious software or virus. These weaknesses are generally implementation mistakes, undiscovered bugs or a legacy problem that require an update to the server to resolve.
PostgreSQL also has a list of known security vulnerability that has been discovered and fixed by the community. The list can be found here: https://www.postgresql.org/support/security/. These vulnerability ranges from different severity levels, from simple memory leak to crash the server.
This is why doing regular PostgreSQL server upgrade is important because each minor release fixes some of the discovered security vulnerabilities and therefore reducing the attack surface on your server.
8. Summary
In part 3 of the blog, we have learned and understood what each TLS related configuration means in postgresql.conf and how to initiate TLS connection with psql client. We learned that keeping PostgreSQL server up-to-date can reduce the attack surface on some of the discovered vulnerabilities. We can ensure a fairly secured database network environment with TLS having adequate understanding of its fundamentals and practices. With the TDE feature coming in near future, we can further secure the database environment in the disk level and prevent possible data loss due to disk theft.