How to Analyze a PostgreSQL Crash Dump File

1. Introduction

In this blog post, I will talk about how to enable the generation of crash dump file (also known as core dump) and some common GDB commands to help a developer troubleshoot a crash-related issues within PostgreSQL and also other applications. Proper analysis of the issue normally will take time and certain degree of knowledge about the application source code. From experience, sometimes it may be better to look at the bigger environment instead of looking at the point of crash.

2. What is a Crash Dump File?

A crash dump file is a file that consists of the recorded state of the working memory of an application when it crashes. This state is represented by stacks of memory addresses and CPU registers and normally it is extremely difficult to debug with only memory addresses and CPU registers because they tell you no information about the application logic. Considering the core dump contents below, which shows the back trace of memory addresses to the point of crash.

#1  0x00687a3d in ?? ()
#2 0x00d37f06 in ?? ()
#3 0x00bf0ba4 in ?? ()
#4 0x00d3333b in ?? ()
#5 0x00d3f682 in ?? ()
#6 0x00d3407b in ?? ()
#7 0x00d3f2f7 in ?? ()

Not very useful is it? So, when we see a crash dump file that looks like this, it means the application is not built with debugging symbols, making this crash dump file useless. If this is the case, you will need to install the debug version of the application or re-build the application with debugging enabled.

3. How to Generate a Useful Crash Dump File

Before the generation of crash dump file, we need to ensure the application is built with debugging symbols. This can be done by executing the ./configure script like this:

./configure enable-debug

This adds the -g argument to CFLAGS in src/Makefile.global with optimization level set to 2 (-O2). My preference is to also change the optimization to 0 (-O0) so when we are navigating the stack using GDB, the navigation will make much more sense rather than jumping around and we will be able to print out most variables values in memory instead of getting optimized out error in GDB.

CFLAGS = -Wall -Wmissing-prototypes -Wpointer-arith -Wdeclaration-after-statement -Werror=vla -Wendif-labels -Wmissing-format-attribute -Wimplicit-fallthrough=3 -Wformat-security -fno-strict-aliasing -fwrapv -fexcess-precision=standard -Wno-format-truncation -g -O0

Now, we can enable the crash dump generation. This can be done by the user limit command.

ulimit -c unlimited

to disable:

ulimit -c 0

Make sure there is enough disk space because crash dump file is normally very large as it records all the memory execution states from start to crash, and make sure the ulimit is set up in the shell before starting PostgreSQL. When PostgreSQL crashes, a core dump file named core will be generated in $PGDATA

4. Analyzing the Dump File using GDB

GDB (GNU Debugger) is a portable debugger that runs on many Unix-like systems and can work with many programming languages and is my favorite tool to analyze a crash dump file. To demonstrate this, I will intentionally add a line in PostgreSQL source code that will result in segmentation fault crash type when a CREATE TABLE command is run.

Assuming the PostgreSQL has already crashed and generated a core dump file core in this location ~/highgo/git/postgres/postgresdb/core. I would first use the file utility to understand more about the core file. Information such as the kernel info, and the program that generated it.

caryh@HGPC01:~$ file /home/caryh/highgo/git/postgres/postgresdb/core
postgresdb/core: ELF 64-bit LSB core file x86-64, version 1 (SYSV), SVR4-style, from 'postgres: cary cary [local] CREATE TABLE', real uid: 1000, effective uid: 1000, real gid: 1000, effective gid: 1000, execfn: '/home/caryh/highgo/git/postgres/highgo/bin/postgres', platform: 'x86_64'
caryh@HGPC01:~$

The file utility tells me that the core file is generated by this application /home/caryh/highgo/git/postgres/highgo/bin/postgres, so I would execute gdb like this:

gdb /home/caryh/highgo/git/postgres/highgo/bin/postgres -c  /home/caryh/highgo/git/postgres/postgresdb/core

GNU gdb (Ubuntu 8.1-0ubuntu3) 8.1.0.20180409-git
Copyright (C) 2018 Free Software Foundation, Inc.
License GPLv3+: GNU GPL version 3 or later <http://gnu.org/licenses/gpl.html>
This is free software: you are free to change and redistribute it.
There is NO WARRANTY, to the extent permitted by law. Type "show copying"
and "show warranty" for details.
This GDB was configured as "x86_64-linux-gnu".
Type "show configuration" for configuration details.
For bug reporting instructions, please see:
<http://www.gnu.org/software/gdb/bugs/>.
Find the GDB manual and other documentation resources online at:
<http://www.gnu.org/software/gdb/documentation/>.
For help, type "help".
Type "apropos word" to search for commands related to "word"...
Reading symbols from /home/caryh/highgo/git/postgres/highgo/bin/postgres...done.
[New LWP 27417]
[Thread debugging using libthread_db enabled]
Using host libthread_db library "/lib/x86_64-linux-gnu/libthread_db.so.1".
Core was generated by `postgres: cary cary [local] CREATE TABLE '.
Program terminated with signal SIGSEGV, Segmentation fault.
#0 heap_insert (relation=relation@entry=0x7f872f532228, tup=tup@entry=0x55ba8290f778, cid=0, options=options@entry=0,
bistate=bistate@entry=0x0) at heapam.c:1840
1840 ereport(LOG,(errmsg("heap tuple len = %d", heaptup->t_len)));
(gdb)

Immediately after running gdb on the core file, it shows the location of the crash at heapam.c:1840 and that is exactly the line I have intentionally added to cause a crash.

5. Useful GDB Commands

With gdb, it is very easy to identify the location of a crash, because it tells you immediately after running gdb on the core file. Unfortunately, 95% of the time, the location of the crash is not the real cause of the problem. This is why I mentioned earlier that sometimes it may be better to look at the bigger environment instead of looking at the point of crash. The crash is likely caused by a mistake in the application logic some where else in the application before it hits the point of crash. Even if you fix the crash, the mistake in application logic still exists and most likely, the application will crash somewhere else later or yield unsatisfactory results. Therefore, it is worth awhile to understand some of the powerful GDB commands that could help us understand the call stacks better to identify the real root cause.

5.1 The bt (Back Trace) command

The bt command shows a series of call stacks since the beginning of the application all the way to the point of crash. With full debugging enabled, you will be able to see the function arguments and values being passed in to each function calls as well as the source file and line numbers where they were called. This allows developer to travel backwards to check for any potential application logic mistake in the earlier processing.


(gdb) bt
#0 heap_insert (relation=relation@entry=0x7f872f532228, tup=tup@entry=0x55ba8290f778, cid=0, options=options@entry=0,
bistate=bistate@entry=0x0) at heapam.c:1840
#1 0x000055ba81ccde3e in simple_heap_insert (relation=relation@entry=0x7f872f532228, tup=tup@entry=0x55ba8290f778)
at heapam.c:2356
#2 0x000055ba81d7826d in CatalogTupleInsert (heapRel=0x7f872f532228, tup=0x55ba8290f778) at indexing.c:228
#3 0x000055ba81d946ea in TypeCreate (newTypeOid=newTypeOid@entry=0, typeName=typeName@entry=0x7ffcf56ef820 "test",
typeNamespace=typeNamespace@entry=2200, relationOid=relationOid@entry=16392, relationKind=relationKind@entry=114 'r',
ownerId=ownerId@entry=16385, internalSize=-1, typeType=99 'c', typeCategory=67 'C', typePreferred=false,
typDelim=44 ',', inputProcedure=2290, outputProcedure=2291, receiveProcedure=2402, sendProcedure=2403,
typmodinProcedure=0, typmodoutProcedure=0, analyzeProcedure=0, elementType=0, isImplicitArray=false, arrayType=16393,
baseType=0, defaultTypeValue=0x0, defaultTypeBin=0x0, passedByValue=false, alignment=100 'd', storage=120 'x',
typeMod=-1, typNDims=0, typeNotNull=false, typeCollation=0) at pg_type.c:484
#4 0x000055ba81d710bc in AddNewRelationType (new_array_type=16393, new_row_type=<optimized out>, ownerid=<optimized out>,
new_rel_kind=<optimized out>, new_rel_oid=<optimized out>, typeNamespace=2200, typeName=0x7ffcf56ef820 "test")
at heap.c:1033
#5 heap_create_with_catalog (relname=relname@entry=0x7ffcf56ef820 "test", relnamespace=relnamespace@entry=2200,
reltablespace=reltablespace@entry=0, relid=16392, relid@entry=0, reltypeid=reltypeid@entry=0,
reloftypeid=reloftypeid@entry=0, ownerid=16385, accessmtd=2, tupdesc=0x55ba8287c620, cooked_constraints=0x0,
relkind=114 'r', relpersistence=112 'p', shared_relation=false, mapped_relation=false, oncommit=ONCOMMIT_NOOP,
reloptions=0, use_user_acl=true, allow_system_table_mods=false, is_internal=false, relrewrite=0, typaddress=0x0)
at heap.c:1294
#6 0x000055ba81e3782a in DefineRelation (stmt=stmt@entry=0x55ba82876658, relkind=relkind@entry=114 'r', ownerId=16385,
ownerId@entry=0, typaddress=typaddress@entry=0x0,
queryString=queryString@entry=0x55ba82855648 "create table test (a int, b char(10)) using heap;") at tablecmds.c:885
#7 0x000055ba81fd5b2f in ProcessUtilitySlow (pstate=pstate@entry=0x55ba82876548, pstmt=pstmt@entry=0x55ba828565a0,
queryString=queryString@entry=0x55ba82855648 "create table test (a int, b char(10)) using heap;",
context=context@entry=PROCESS_UTILITY_TOPLEVEL, params=params@entry=0x0, queryEnv=queryEnv@entry=0x0, qc=0x7ffcf56efe50,
dest=0x55ba82856860) at utility.c:1161
#8 0x000055ba81fd4120 in standard_ProcessUtility (pstmt=0x55ba828565a0,
queryString=0x55ba82855648 "create table test (a int, b char(10)) using heap;", context=PROCESS_UTILITY_TOPLEVEL,
params=0x0, queryEnv=0x0, dest=0x55ba82856860, qc=0x7ffcf56efe50) at utility.c:1069
#9 0x000055ba81fd1962 in PortalRunUtility (portal=0x55ba828b7dd8, pstmt=0x55ba828565a0, isTopLevel=<optimized out>,
setHoldSnapshot=<optimized out>, dest=<optimized out>, qc=0x7ffcf56efe50) at pquery.c:1157
#10 0x000055ba81fd23e3 in PortalRunMulti (portal=portal@entry=0x55ba828b7dd8, isTopLevel=isTopLevel@entry=true,
setHoldSnapshot=setHoldSnapshot@entry=false, dest=dest@entry=0x55ba82856860, altdest=altdest@entry=0x55ba82856860,
qc=qc@entry=0x7ffcf56efe50) at pquery.c:1310
#11 0x000055ba81fd2f51 in PortalRun (portal=portal@entry=0x55ba828b7dd8, count=count@entry=9223372036854775807,
isTopLevel=isTopLevel@entry=true, run_once=run_once@entry=true, dest=dest@entry=0x55ba82856860,
altdest=altdest@entry=0x55ba82856860, qc=0x7ffcf56efe50) at pquery.c:779
#12 0x000055ba81fce967 in exec_simple_query (query_string=0x55ba82855648 "create table test (a int, b char(10)) using heap;")
at postgres.c:1239
#13 0x000055ba81fd0d7e in PostgresMain (argc=<optimized out>, argv=argv@entry=0x55ba8287fdb0, dbname=<optimized out>,
username=<optimized out>) at postgres.c:4315
#14 0x000055ba81f4f52a in BackendRun (port=0x55ba82877110, port=0x55ba82877110) at postmaster.c:4536
#15 BackendStartup (port=0x55ba82877110) at postmaster.c:4220
#16 ServerLoop () at postmaster.c:1739
#17 0x000055ba81f5063f in PostmasterMain (argc=3, argv=0x55ba8284fee0) at postmaster.c:1412
#18 0x000055ba81c91c04 in main (argc=3, argv=0x55ba8284fee0) at main.c:210
(gdb)

5.1 The f (Fly) command

The f command followed by a stack number allows gdb to jump to a particular call stack listed by the bt command and allows you to print other variable in that particular stack. For example:

(gdb) f 3
#3 0x000055ba81d946ea in TypeCreate (newTypeOid=newTypeOid@entry=0, typeName=typeName@entry=0x7ffcf56ef820 "test",
typeNamespace=typeNamespace@entry=2200, relationOid=relationOid@entry=16392, relationKind=relationKind@entry=114 'r',
ownerId=ownerId@entry=16385, internalSize=-1, typeType=99 'c', typeCategory=67 'C', typePreferred=false,
typDelim=44 ',', inputProcedure=2290, outputProcedure=2291, receiveProcedure=2402, sendProcedure=2403,
typmodinProcedure=0, typmodoutProcedure=0, analyzeProcedure=0, elementType=0, isImplicitArray=false, arrayType=16393,
baseType=0, defaultTypeValue=0x0, defaultTypeBin=0x0, passedByValue=false, alignment=100 'd', storage=120 'x',
typeMod=-1, typNDims=0, typeNotNull=false, typeCollation=0) at pg_type.c:484
484 CatalogTupleInsert(pg_type_desc, tup);
(gdb)

This forces gdb to jump to stack number 3, which is at pg_type.c:484. In here, you can examine all other variables in this frame (in function TypeCreate).

5.2 The p (Print) command

The most popular command in gdb, which can be used to print variable addresses and values

(gdb) p tup
$1 = (HeapTuple) 0x55ba8290f778
(gdb) p pg_type_desc
$2 = (Relation) 0x7f872f532228

(gdb) p * tup
$3 = {t_len = 176, t_self = {ip_blkid = {bi_hi = 65535, bi_lo = 65535}, ip_posid = 0}, t_tableOid = 0,
t_data = 0x55ba8290f790}

(gdb) p * pg_type_desc
$4 = {rd_node = {spcNode = 1663, dbNode = 16384, relNode = 1247}, rd_smgr = 0x55ba828e2a38, rd_refcnt = 2, rd_backend = -1,
rd_islocaltemp = false, rd_isnailed = true, rd_isvalid = true, rd_indexvalid = true, rd_statvalid = false,
rd_createSubid = 0, rd_newRelfilenodeSubid = 0, rd_firstRelfilenodeSubid = 0, rd_droppedSubid = 0,
rd_rel = 0x7f872f532438, rd_att = 0x7f872f532548, rd_id = 1247, rd_lockInfo = {lockRelId = {relId = 1247, dbId = 16384}},
rd_rules = 0x0, rd_rulescxt = 0x0, trigdesc = 0x0, rd_rsdesc = 0x0, rd_fkeylist = 0x0, rd_fkeyvalid = false,
rd_partkey = 0x0, rd_partkeycxt = 0x0, rd_partdesc = 0x0, rd_pdcxt = 0x0, rd_partcheck = 0x0, rd_partcheckvalid = false,
rd_partcheckcxt = 0x0, rd_indexlist = 0x7f872f477d00, rd_pkindex = 0, rd_replidindex = 0, rd_statlist = 0x0,
rd_indexattr = 0x0, rd_keyattr = 0x0, rd_pkattr = 0x0, rd_idattr = 0x0, rd_pubactions = 0x0, rd_options = 0x0,
rd_amhandler = 0, rd_tableam = 0x55ba82562c20 <heapam_methods>, rd_index = 0x0, rd_indextuple = 0x0, rd_indexcxt = 0x0,
rd_indam = 0x0, rd_opfamily = 0x0, rd_opcintype = 0x0, rd_support = 0x0, rd_supportinfo = 0x0, rd_indoption = 0x0,
rd_indexprs = 0x0, rd_indpred = 0x0, rd_exclops = 0x0, rd_exclprocs = 0x0, rd_exclstrats = 0x0, rd_indcollation = 0x0,
rd_opcoptions = 0x0, rd_amcache = 0x0, rd_fdwroutine = 0x0, rd_toastoid = 0, pgstat_info = 0x55ba828d5cb0}
(gdb)

With the asteroid, you can tell the p command to either print the address of a pointer or the values pointed by the pointer.

5.3 The x (examine) command

The x command is used to examine a memory block contents with specified size and format. The following example tries to examine the t_data values inside a HeapTuple structure. Note that we first print the *tup pointer to learn the size of t_data is 176, then we use the x command to examine the first 176 bytes pointed by t_data

(gdb)  p *tup
$6 = {t_len = 176, t_self = {ip_blkid = {bi_hi = 65535, bi_lo = 65535}, ip_posid = 0}, t_tableOid = 0,
t_data = 0x55ba8290f790}

(gdb) p tup->t_data
$7 = (HeapTupleHeader) 0x55ba8290f790
(gdb) x/176bx tup->t_data
0x55ba8290f790: 0xc0 0x02 0x00 0x00 0xff 0xff 0xff 0xff
0x55ba8290f798: 0x47 0x00 0x00 0x00 0xff 0xff 0xff 0xff
0x55ba8290f7a0: 0x00 0x00 0x1f 0x00 0x01 0x00 0x20 0xff
0x55ba8290f7a8: 0xff 0xff 0x0f 0x00 0x00 0x00 0x00 0x00
0x55ba8290f7b0: 0x0a 0x40 0x00 0x00 0x74 0x65 0x73 0x74
0x55ba8290f7b8: 0x00 0x00 0x00 0x00 0x00 0x00 0x00 0x00
0x55ba8290f7c0: 0x00 0x00 0x00 0x00 0x00 0x00 0x00 0x00
0x55ba8290f7c8: 0x00 0x00 0x00 0x00 0x00 0x00 0x00 0x00
0x55ba8290f7d0: 0x00 0x00 0x00 0x00 0x00 0x00 0x00 0x00
0x55ba8290f7d8: 0x00 0x00 0x00 0x00 0x00 0x00 0x00 0x00
0x55ba8290f7e0: 0x00 0x00 0x00 0x00 0x00 0x00 0x00 0x00
0x55ba8290f7e8: 0x00 0x00 0x00 0x00 0x00 0x00 0x00 0x00
0x55ba8290f7f0: 0x00 0x00 0x00 0x00 0x98 0x08 0x00 0x00
0x55ba8290f7f8: 0x01 0x40 0x00 0x00 0xff 0xff 0x00 0x63
0x55ba8290f800: 0x43 0x00 0x01 0x2c 0x08 0x40 0x00 0x00
0x55ba8290f808: 0x00 0x00 0x00 0x00 0x09 0x40 0x00 0x00
0x55ba8290f810: 0xf2 0x08 0x00 0x00 0xf3 0x08 0x00 0x00
0x55ba8290f818: 0x62 0x09 0x00 0x00 0x63 0x09 0x00 0x00
0x55ba8290f820: 0x00 0x00 0x00 0x00 0x00 0x00 0x00 0x00
0x55ba8290f828: 0x00 0x00 0x00 0x00 0x64 0x78 0x00 0x00
0x55ba8290f830: 0x00 0x00 0x00 0x00 0xff 0xff 0xff 0xff
0x55ba8290f838: 0x00 0x00 0x00 0x00 0x00 0x00 0x00 0x00
(gdb)

7. Conclusion

In this blog, we have discussed about how to generate a useful crash dump file with sufficient debug symbols to help developers troubleshoot a crash issue in PostgreSQL and also in other applications. We have also discussed about a very powerful and useful debugger gdb and shared some of the most common commands that can be utilized to troubleshoot a crash issue from a core file. I hope the information here can help some developers out there to troubleshoot issues better.
In-Memory Table with Pluggable Storage API

1. Introduction

This blog is to follow up on the post I published back in July, 2020 about achieving an in-memory table storage using PostgreSQL’s pluggable storage API. In the past few months, my team and I have made some progress and did a few POC patches to prove some of the unknowns and hypothesis and today I would like to share our progress.

2. The PostgreSQL Buffer Manager

In the previous post, I mentioned that we would like to build a new in-memory based storage that is based on the existing buffer manager and its related component and hooked it up with the pluggable storage API. To achieve this, my team and I underwent an in-depth study to understand how the current buffer manager works in PostgreSQL and this chapter at interdb.jp is a good starting point for us to gain a general understanding of the buffer manager design in good details.

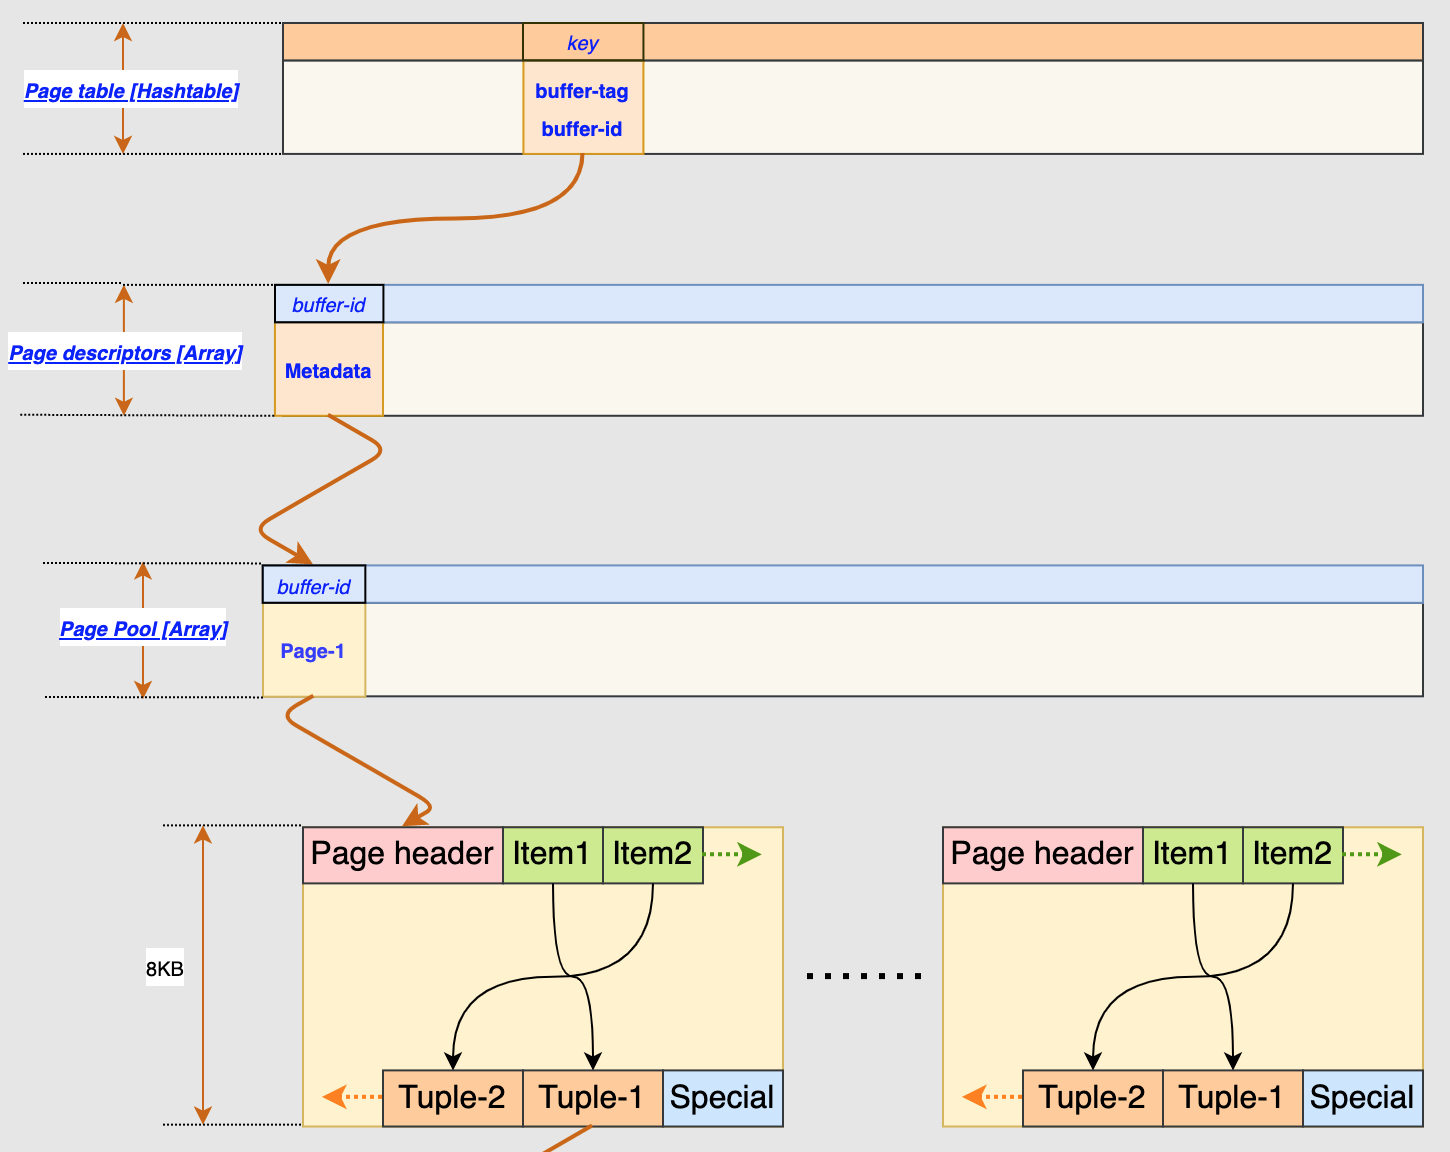
The current PostgreSQL buffer manager follows a 3-layer buffer design to manage the data pages as illustrated by this image below:

bufmgr

where it consists of

  • Buffer Table (hash table)
  • Buffer Descriptors (Array)
  • Buffer Pool (Array)

2.1 Page Table

Buffer Table is used like a routing table between PostgreSQL Core and the buffer manager. It is managed using the existing hash table utilities and uses buffer_tag to look up the page descriptor and buffer id. Buffer_tag is a structure that contains the table space, database, table name.

2.2 Buffer Descriptor

Buffer Descriptor is used to store the status of a buffer block and also the content lock. Refcount is a part of the buffer state, will be used to indicate the insert and delete operation. it will be increased by one when there is an insertion, and decreased by one when there is a deletion. The Vacuum process will reclaim this page once refcount reaches to 0.

2.3 Buffer Pool

Buffer Pool has a one to one relationship with buffer descriptor. it can be treated a simple pointer pointing to the beginning of the buffer pool, each buffer pool slot is defined as 8KB for now. This is the lowest layer in the buffer manager structure before a page is flushed to disk. The BM_DIRTY status flag is used to indicate if a page in the buffer pool is to be flushed to disk

In addition to buffer pool, buffer manager also utilizes a ring buffer for reading and writing a huge table whose size exceeds 1/4 of the buffer pool size. Clock Sweep algorithm is used to find a victim page in the ring buffer to eject and flush to disk so new page can enter, thus the name, ring buffer.

3. The In-Memory Only Buffer Manager

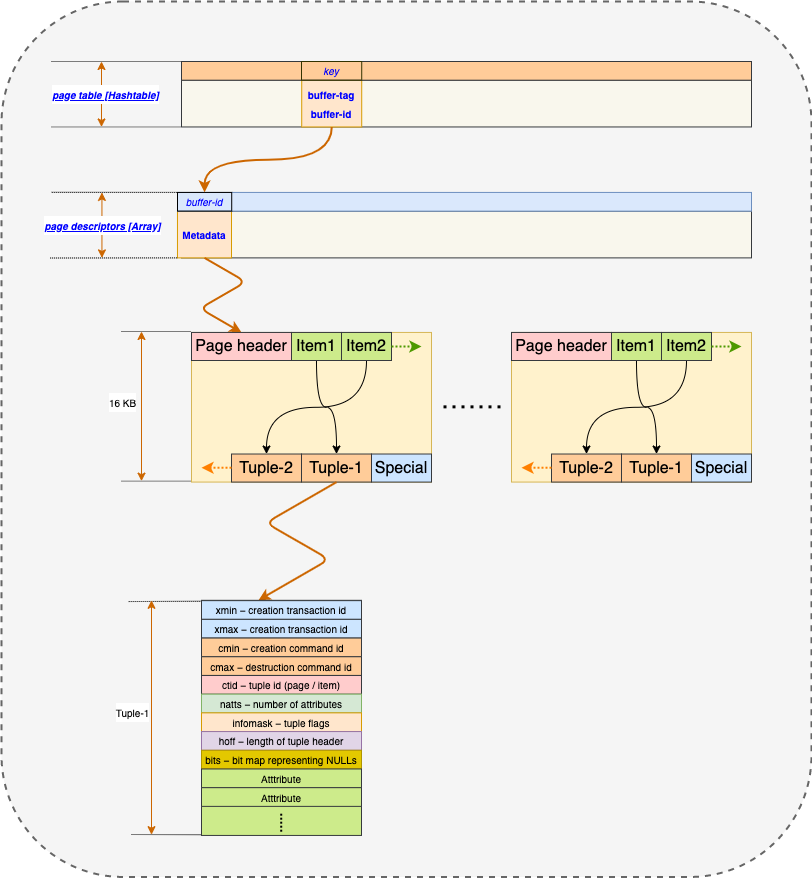
Having a general understanding of the existing buffer manager’s strucutre, we hypothesize that we could potentially improve its IO performance by eliminating the need to flush any buffer data to disk. This means that the in-memory only version of buffer manager itself is the storage media. For this reason, its strucutre can be simplified as:

bufmgr

where the buffer descriptor points to a dedicated memory storage that contains the actual page and tuple. This memory space can be allocated to a certain size at initlaization and there will not be a need to flush a page to disk. All data page and tuple will reside in this memory space. In the case where there is a huge reading and writing load, the ring buffer will not be allocated as the logic to find a victim page to evict and flush to disk will be removed since everything will reside in a dedicated memory space. For this reason, if the memory space is not sufficiently allocated, the user will get “no unpin buffer” is available, which basically means “your disk is full” and you need to do delete and vacuum.

Using this approach, when the server shuts down or restarts, the data in this memory space is of course lost. So, data persistence to disk would be a topic of interest next, but right now, we already see some useful business case with this in-memory based table where data processing speed is more important than data persistence

4. Initial Results

Using the same tuple structure and logic as the current heap plus the memory based buffer manager with 1GB of memory allocated, we observe some interesting increase in performance comparing to PostgreSQL with default settings. For 20 million row, we observe about 50% increase for insert, 70% increase for update, 60% increase for delete and 30% increase in vacuum. This result is not too bad considering we are still at the early stages and I am sure there are many other ways to make it even faster

5. Next Step

Having some solid results from the initial test, it would make sense for us to also be looking into having the index tuples as in-memory storage only. In addition, free space map and visibility map files that are stored in the PG cluster directory could potentially also be made as in-memory to possibly further increase the DML performance.

TLS Related Updates in PostgreSQL 13

1. Introduction

The upcoming major release of PostgreSQL 13 has several important behavioral updates related to the TLS implementation. These updates may have some to your current PostgreSQL security deployment if you were considering to upgrade to 13 when it officially releases. Today I would like to do a quick summary of these updates.

2. Minimum TLS Version Changed to TLSv1.2

There are 2 server parameters in postgresql.conf that influence the desired TLS versions to use during communication, ssl_min_protocol_version and ssl_max_protocol_version. In previous PG versions, the default value for ssl_min_protocol_version was TLSv1, in which many older versions of OpenSSL could support. In PG13, this default has been raised to TLSv1.2, which satisfies current industry’s best practice. This means that if your psql client is built using older version of OpenSSL, such as 1.0.0., the PG13 server by default will deny this TLS connection, until either you rebuild the psql client with newer version of OpenSSL, or you lower the ssl_min_protocol_version back to TLSv1. Lowering this default is strongly discouraged as older versions of TLS are not as secured and many industrial applications are communicating using TLSv1.2 as a standard requirement now.

3. New libpq connection parameters

There are also several updates to the libpq client side connection parameters related to TLS. See sub sections below:

3.1 ssl_min_protocol_version and ssl_max_protocol_version

The ssl_min_protocol_version and ssl_max_protocol_version parameters defined in the postgresql.conf on the server side were not available in the libpq client side in the previous PG versions. This means that in previous versions, it was not possible for client to influence the desired version of TLS to used as it would always want to used the newest TLS versions to communicate with the server. This may not be ideal in some cases. In PG13, the same sets of parameters are added to the libpq client side as well such that the client can also play a part in determining the ideal TLS version for communication. These parameters can be specified to psql like so:

psql -U user -d "sslmode=require dbname=postgres ssl_max_protocol_version=TLSv1.2"
psql -U user -d "sslmode=require dbname=postgres ssl_min_protocol_version=TLSv1.3"

The second command in the above example sets minimum TLS protocol to TLSv1.3, which means that this client would only want to communicate with a server that could support TLSv1.3 as minimum version requirement. TLSv1.3 is fairly new and not every PostgreSQL servers are built with this support. In this case, the client simply refuses to communicate. These parameters are great additions to the current libpq as they give the client the ability to enforce the desired TLS version to use rather than simply letting the server to decide, resulting in a much more secured environment.

3.2 channel_binding

Channel binding is a new feature introduced in PG13, in which the libpq client can optionally enable to further increase the security of the TLS connection. The channel_binding parameter can be set to require to enforce the channel binding feature, prefer to only use channel binding if it is available or disable to not use channel binding at all. prefer is the default value for the new channel_binding parameter.

The channel binding feature enforces trust between client and server so that Client informs the server whom it thinks it speaks to, and Server validates whether it is correct or not. This prevents an attacker who is able to capture users’ authentication credentials (e.g. OAuth tokens, session identifiers, etc) from reusing those credentials in another TLS sessions. In PG13, the channel binding is done by tying the user’s scram-sha-256 credentials to a unique fingerprint of the TLS session in which they are used (channel binding), so they cannot be reused in another TLS sessions initiated by the attacker.

To use this feature, we need to define a rule in pg_hba.conf that uses scram-sha-256 as authentication method. Ex:

hostssl    all    all    127.0.0.1/32    scram-sha-256

also set the default password authentication method to scram-sha-256 in postgresql.conf.

password_encryption = scram-sha-256

and then sets a scram-sha-256 password for the current user or another user in a existing psql connection

\password

or \password [username]

then finally, we can use psql with channel binding to connect to the server. Ex:

psql -U user -d "sslmode=require dbname=postgres channel_binding=require ssl_min_protocol_version=TLSv1.2"

3.3 sslpassword

In previous version of PG, in a sslmode=verify-full case, the client will need to specify its X509 certificate, private key and CA cert to complete the entire TLS authentication. In the case where the private key supplied by the client is encrypted with a password, the psql will prompt the user to enter it before proceeding with the TLS authentication. The new sslpassword parameter allows the user to specify the password to the connection parameters without prompting the user to enter it. This is a useful addition, as the psql command could basically completes without having a human or a bot to enter the passphrase to unlock the private key. This parameter can be used like this:

psql -U user -d "sslmode=verify-full dbname=postgres sslrootcert=cacert.pem sslcert=client.pem sslkey=client.key sslpassword=mypass"

4. Remove support for OpenSSL 0.9.8 and 1.0.0

Another major change is that PG13 will refuse to be built with OpenSSL versions 1.0.0 and 0.9.8 as these are very old and are no longer considered secured in today’s standard. If you are still using these OpenSSL versions, you will need to upgrade to newer or recent versions to be compatible with PG13.

5. Conclusion

PG13 brings many exciting new features and enhancements to PostgreSQL and many of these new changes need to be carefully assessed for potential incompatibility with the previous PG versions. Today, our focus is mainly on new updates related to TLS, which may have behavioral impacts to the existing deployment and the way existing client and server communicates using TLS. For the full changes and potential incompatibilities, visit the official change log here

Approaches to Achieve in-memory table storage with PostgreSQL pluggable API

1. Introduction

Recently, I have had an opportunity to perform some in-depth feasibility study in-memory table using PostgreSQL’s pluggable storage API. The pluggable storage API was introduced Since PostgreSQL v12 and it allowed custom table storage Access Methods (AM for short) to be developed. Some famous examples include zheap from EDB, which aims to store a much more simplified tuple structure to achieve vacuum free storage and zedstore from Greenplum to utilize columnar storage. But they do not utilize in-memory storage and still interacts with existing buffer manager to persist data to disk.

Yes, it would be nice to have in-memory tables if they would perform faster. It would definitely be a very interesting challenge if we could achieve an in-memory table storage engine and design it in a way that will give serious performance advantages using the existing pluggable storage API architecture.

Developing a custom storage AM is no easy task and it requires a very deep understanding on how the current PostgreSQL storage engine works before we are able to improve it. In addition to redefining the tuple structure and custom algorithms to store and retrieve, it is also possible to define our own in-memory based storage module to handle the insertion and retrieval of tuple instead of utilizing the same buffer manager routines like what heap, zheap and zedstore access methods are using.

In this blog, I will briefly talk about the capability of pluggable storage API and share some progress on our in-memory table analysis

2. The Pluggable Storage Access Method API

PostgreSQL already has a pluggable index access method API for defining different index methods such as btree, gin and gist…etc where btree is the default index method today. The desired method can be selected when issuing the CREATE INDEX command like:

CREATE INDEX gin_idx ON movies USING gin (year);
CREATE INDEX gist_idx ON movies USING gist (year);

Before PostgreSQL v12, there was not a pluggable access method for defining table storage and heap was the only access method available. After the introduction of pluggable storage API in v12, it is now possible to create custom storage access methods other than the default heap using similar syntax when creating a table like:

CREATE ACCESS METHOD myheap TYPE TABLE HANDLER myheap_handler;
CREATE TABLE mytable (a int, b char(10)) using myheap;

There are a total of 38 callback functions provided by the pluggable API that requires to be implemented to develop a new table access method. They are defined in TableAmRoutine structure in tableam.h. It is quite tedious to explain all 38 callback functions here but in short, they primarily have to deal with:

  • slot type
  • table sequential scan
  • parallel table scan
  • index scan
  • tuple visibility check
  • tuple modification, update, insert, etc
  • DDL related function, setting relfilenode, vacuum and …etc
  • TOAST information
  • planner time estimation
  • bitmap and sample scan functionality

As you can see, the functionalities to be provided by these callback functions are very critical as they have direct impact on how efficient or inefficient it is to retrieve and store data

3. Using Pluggable Storage API to Achieve in-memory table

The pluggable API does not directly deal with data storage to disk and it has to rely on interacting with buffer manager, which in turn, puts the tuple on disk via storage manager. This is a good thing, because with this architecture, we could potentially create a memory cache module and have the pluggable API’s tuple modification and scanning callbacks to interact with this new memory cache instead for faster tuple insertion and retrieval.

It is possible to achieve a very simple in-memory table with this approach, but there are some interesting considerations here.

  • can existing buffer manager still play a role to perform data persistence on disk?
  • how large can memory cache size be?
  • how and when should memory cache persist data to disk?
  • can the access method work if it does not utilize buffer manager routines at all, ie. without CTID?
  • is existing buffer manager already acting like a in-memory data storage if its buffer pool is allocated large enough and we don’t mark a page as dirty, so in theory the data always stays in the buffer pool?

3.1 Buffer Manager

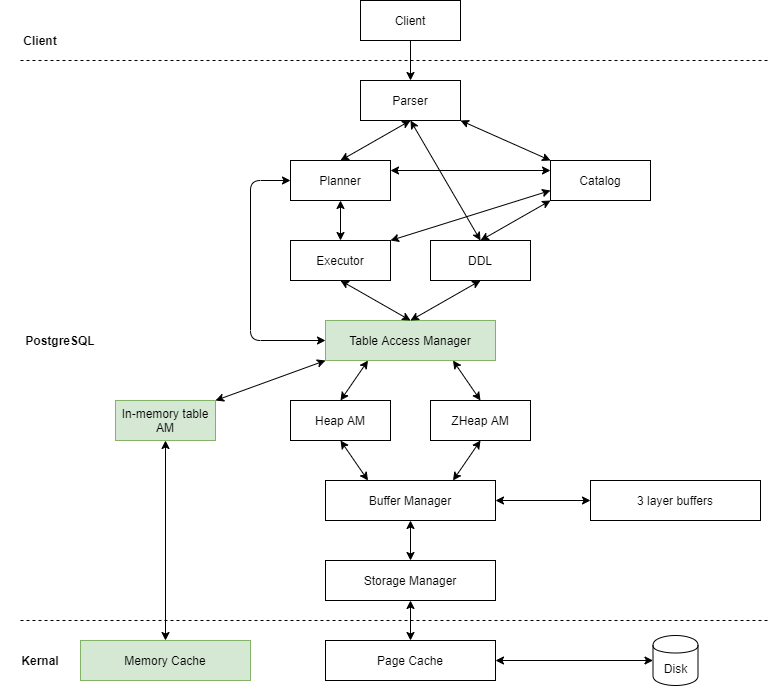
Let’s talk about buffer manager. PostgreSQL buffer manager is a very well-written module that works as an intermediate data page buffer before they are flushed to the disk. Existing heap access method and others like zheap and zedstore impementations make extensive use of buffer manager to achieve data storage and persistence on disk. In our in-memory table approach, we actually would like to skip the buffer manager routines and replace it with our own memory cache or similar. So in terms of architecture, it would look something like this where the green highlighted block is what we would like to achieve with in-memory table.

in-mem-table

In this approach, the design of the memory cache component would be a challenge as it essentially replaces the functionality of existing buffer manager and utilize in-memory data storage instead. For this reason, the CTID value, which points directly to a specific data page managed by buffer manager, may not be valid anymore if buffer manager is no longer to be used. The concern would be if it is possible to implement a new access method without buffer manager and CTID? Our investigation shows yes, it is possible for the access method to not use buffer manager and CTID at all, but it would require the pluggable API to manually fill the TupleTableSlot when it has retrieved a tuple from memory cache.

3.2 Buffer Manager as In-memory storage?

Another question that rises is that If the existing buffer manager has a large enough buffer pool and we never mark a page as dirty, the buffer manager theoretically will not flush a page to disk and in this case, will we have something very similar to the memory cache module? Theoretically yes, but unfortunately it is not how current buffer manager is designed to do. Buffer manager maintains a ring buffer with limited size and data is flushed to disk when new data enters or when they are deemed as “dirty”. It uses a 3-layer buffer structure to manage the location of each data page on disk and provides comprehensive APIs to the PostgreSQL backend processes to interact, insert and retrieve a tuple. If a tuple resides on the disk instead of in the buffer, it has to retrieve it from the disk.

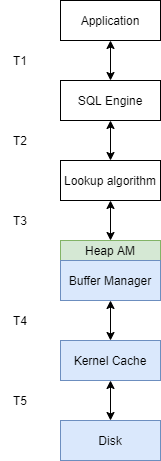
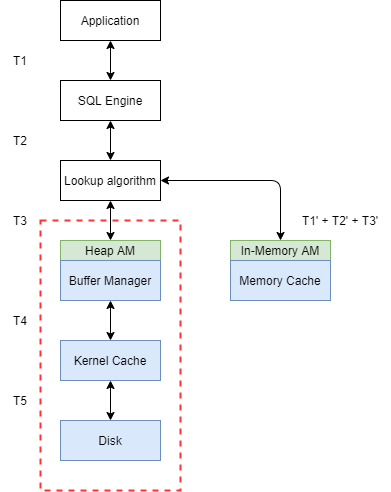
In terms of time ticks, this is how PG retrieves a tuple from disk:

buffer manager time ticks

As you can see, it takes T1+T2+T3+T4+T5 to retrieve a tuple from disk. With the approach of in-memory table, we want to cut off the time takes to retrieve tuple from disk, like:

memory cache time ticks

which takes T1’ + T2’ + T3’ to retrieve a tuple from the memory cache. This is where in-memory table implementation can help with performance increase.

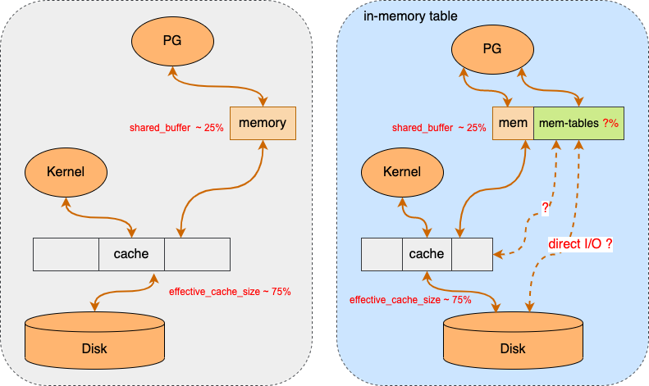
3.3 Ideal Size for this New Memory Cache?

The official PostgreSQL documentation recommends allocation of 25% of all the available memory, but no more than 40%. The rest of the available memory should be reserved for kernel and data caching purposes. From this 25% ~ 40% of reserved memory for PG, we need to minus the shared memory allocations from other backend processes. The remainder would be the maximum size the memory cache can allocate and depending on the environment it may or may not be enough. See image below.

memory size allocation

4. Our Approach?

Since our focus is primarily on the memory cache, which is an alternative to existing buffer manager, we would prefer to use the existing Heap tuple as data strucuture to begin with. This way, we can use the existing TOAST, vacuum, WAL, scanning logics and we will primarily focus on replacing its buffer manager interactions with memory-cache equivalent function calls. All this will be done as a separate extension using pluggable API, so it is still possible to use the default Heap access methods on some tables and use in-memory access methods for some other tables.

An Overview of PostgreSQL Backend Architecture

1. Introduction

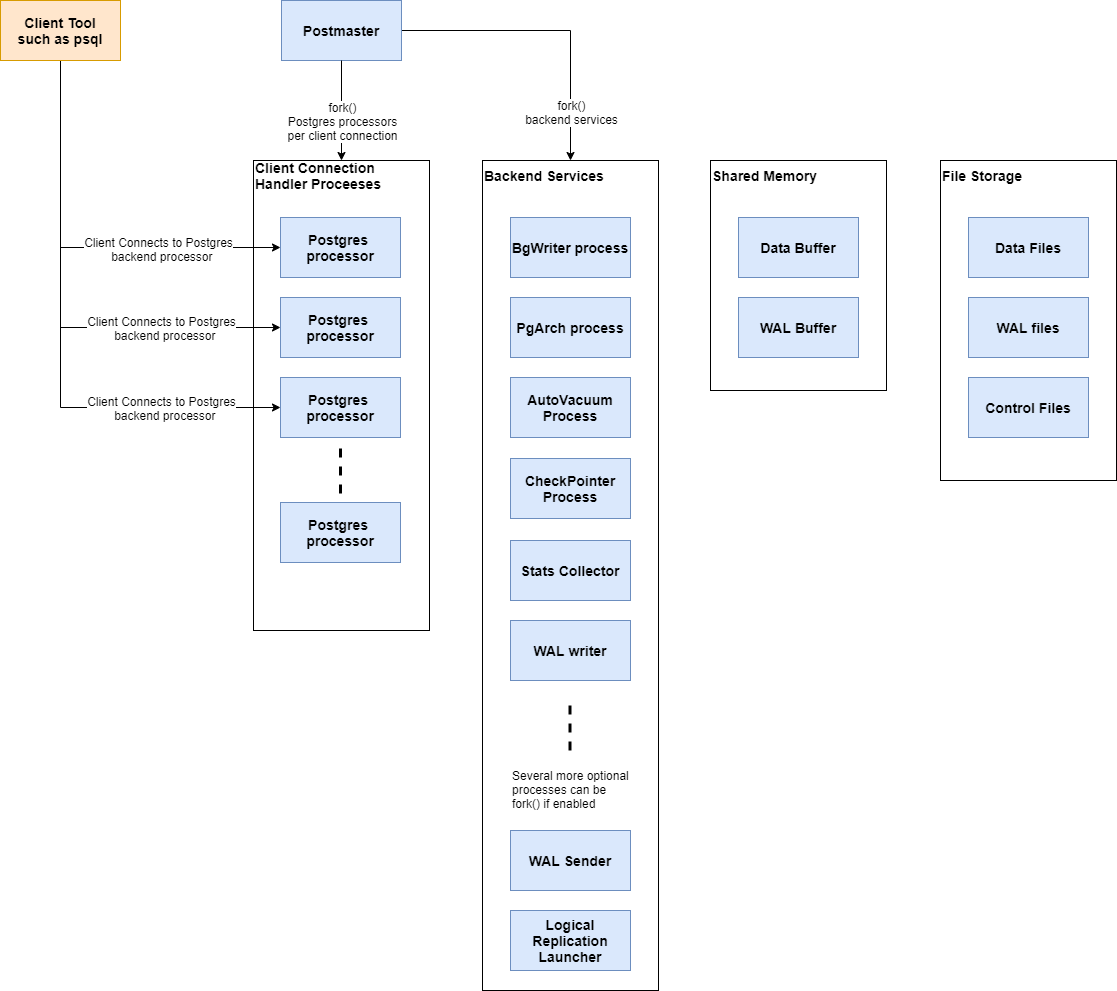
PostgreSQL backend is a collection of processes forked from the main process called Postmaster. Each forked process has different roles and responsibilities in the backend. This article describes the responsibility of core backend processes that power the PostgreSQL system as we know it today. The overall PostgreSQL backend architecture can be illustrated by the image below:

pg-backend-architecture

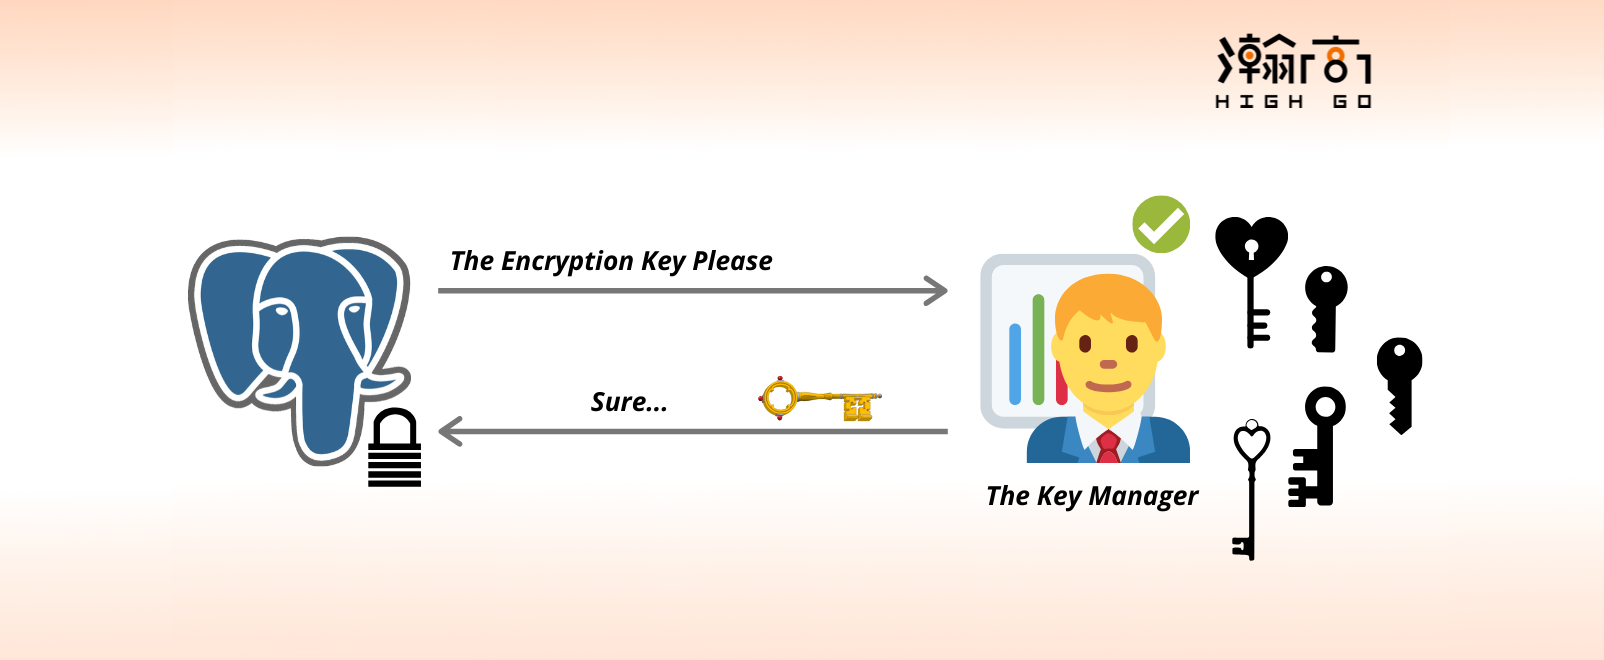
Benefits of External Key Management System Over the Internal and how these could help securing PostgreSQL

1. Introduction

Data and user security have always been important considerations for small to large enterprises during the deployment of their database or application servers. PostgreSQL today has rich support for many network level and user level security features. These include TLS to secure database connections, internal user authentication, integration with external user authentication services such as RADIUS, LDAP and GSSAPI, and TLS certificate based user authentication …etc. However, it does not yet support Transparent Data Encryption (TDE) feature where all the database files and logs have an option to be encrypted before written to disk or decrypted when retrieving from the disk. This adds extra security measure to protect against disk theft.

All these features have something in common; they all use cryptographic keys (either symmetrical or asymmetrical, statically generated or exchanged on the fly using Diffie Hellman) in some ways to achieve the security goals. It is quite common for an organization to focus entirely on the actual data encryption part but pay minimal attention to the cryptographic keys that make the encryption possible. In fact, data encryption is the easy part, the protection of the cryptographic keys is often the hardest as it has several levels of complexities.

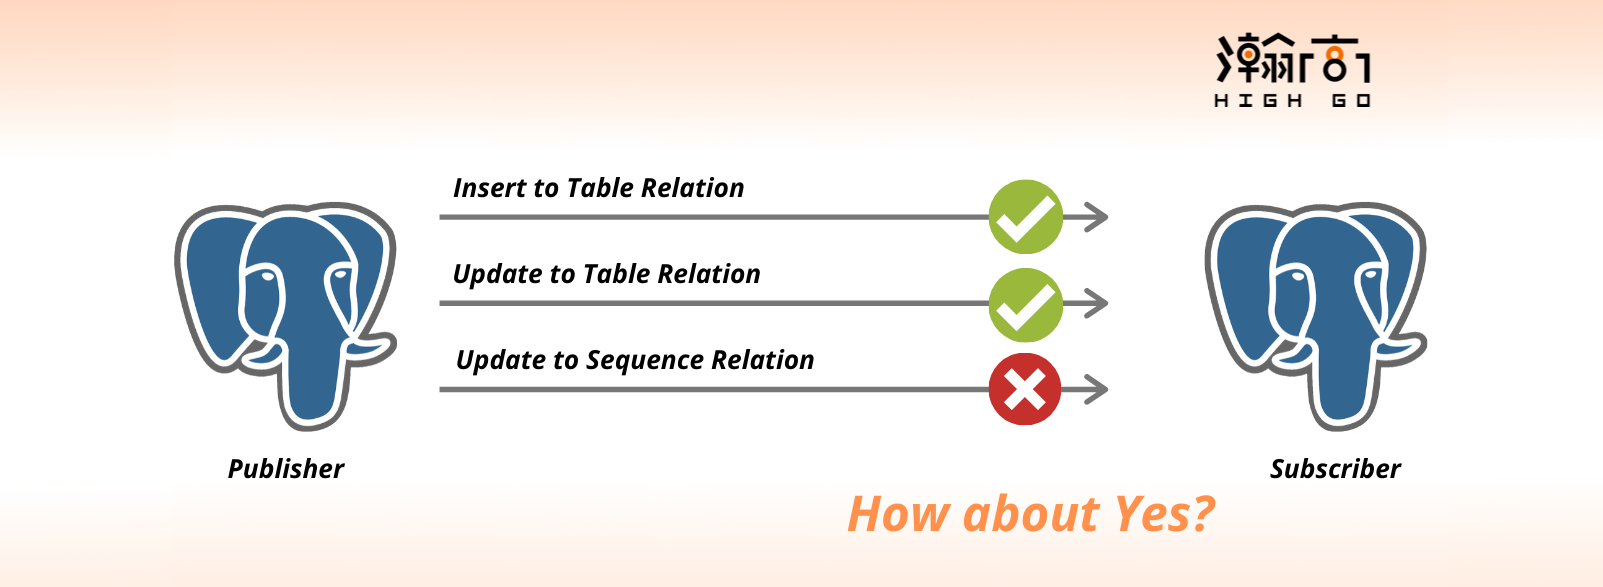
Can Sequence Relation be Logically Replicated?

1. Introduction

I have noticed that there is a page on the offical PostgreSQL documentation (https://www.postgresql.org/docs/current/logical-replication-restrictions.html) that states several restrictions to the current logical replication design. One of the restrictions is about sequence relation type where any changes associated with a sequence relation type is not logically replicated to the subscriber or to the decoding plugin. This is an interesting restriction and I took the initiative to look into this restriction further and evaluate if it is possible to have it supported. I have consulted several senior members in the PostgreSQL communitiy and got some interesting responses from them. In this blog, I will share my current work in the area of supporting sequence replication.

Logical Replication Between PostgreSQL and MongoDB

1. Introduction

PostgreSQL and MongoDB are two popular open source relational (SQL) and non-relational (NoSQL) databases available today. Both are maintained by groups of very experienced development teams globally and are widely used in many popular industries for adminitration and analytical purposes. MongoDB is a NoSQL Document-oriented Database which stores the data in form of key-value pairs expressed in JSON or BSON; it provides high performance and scalability along with data modelling and data management of huge sets of data in an enterprise application. PostgreSQL is a SQL database designed to handle a range of workloads in many applications supporting many concurrent users; it is a feature-rich database with high extensibility, which allows users to create custom plugins, extensions, data types, common table expressions to expand existing features

I have recently been involved in the development of a MongoDB Decoder Plugin for PostgreSQL, which can be paired with a logical replication slot to publish WAL changes to a subscriber in a format that MongoDB can understand. Basically, we would like to enable logical replication between MongoDB (as subscriber) and PostgreSQL (as publisher) in an automatic fashion. Since both databases are very different in nature, physical replication of WAL files is not applicable in this case. The logical replication supported by PostgreSQL is a method of replicating data objects changes based on replication identity (usually a primary key) and it would be the ideal choice for this purpose as it is designed to allow sharing the object changes between PostgreSQL and multiple other databases. The MongoDB Decoder Plugin will play a very important role as it is directly responsible for producing a series of WAL changes in a format that MongoDB can understand (ie. Javascript and JSON).

In this blog, I would like to share some of my initial research and design approach towards the development of MongoDB Decoder Plugin.

Understanding Security Features in PostgreSQL - Part 3

1. Introduction

This is part 3 of the blog “Understanding Security Features in PostgreSQL”, in which I will be discussing how to apply TLS in both PostgreSQL server and client using the principles we have learned in part 2 of the blog. In the end, I will also briefly talk about Transparent Data Encryption (TDE) and security vulnerability.

Understanding Security Features in PostgreSQL - Part 2

1. Introduction

This is part 2 of the blog “Understanding Security Features in PostgreSQL”, in which I will be discussing TLS in greater details. I will begin by going over some of the most important security concepts around TLS before jumping into enabling TLS on PostgreSQL server. I believe it is crucial to have sufficient background information on TLS before tweaking the TLS settings in both client and server sides.

In part 1 of this blog, we mostly discussed about authentication and authorization (AA), which is important to identify which client is permitted to connect and which table or column he/she is permitted to operate. Even with the strongest authentication and authorization, the actual communication between client and server will not be encrypted unless Transport Layer Security (TLS) is specifically enabled in the database server. TLS is one of the least understood but commonly used security protocol that ensures the security of many HTTPS sites and other services. TLS is a big protocol and this blog will describe how it works and how to enable TLS in your PostgreSQL server.

Your browser is out-of-date!

Update your browser to view this website correctly. Update my browser now

×