Using GDB To Trace Into a Parallel Worker Spawned By Postmaster During a Large Query

1. Introduction

I am working on a new PostgreSQL feature that redefines the way a tuple’s visibility status is determined. The feature is working very nicely until I start doing a large SELECT query, which triggers PostgreSQL to spawn multiple parallel workers to process the request. When this happens, the feature I am working on start to yield incorrect results. A good portion of the data tuples returned are missing because they are considered as invisible, while some portion of it remains visible. It immediately came to my attention that the new feature I am working on does not work in parallel worker mode and somehow I need to find a way to debug into a spawned parallel worker to examine how it is computing the visibility and what is missing inside.

In this blog, I would like to share with you how I use GDB to debug and trace into a new parallel worker spawned by Postmaster in order to fix the visibility issue.

2. GDB Basics

I wrote another blog previously that shows how to use GDB to trace and debug a PostgreSQL issues and share some of the most common commands that I use every day to resolve software issues. If you are new to GDB, I suggest giving this blog a read here

3. How and When does PG Spawn A New Parallel Worker

When you use psql to connect to a PostgreSQL database, it will spawn a new backend worker process to serve this connecting client. Most of the queries you provide will be processed by this backend process, includes SELECT, UPDATE, INSERT…etc. By default, if your SELECT query will require doing a sequential scan over 8MB of data, it will try to use a parallel worker to help speed up the processing. This 8MB threshold can be configured by the min_parallel_table_scan_size parameter in postgresql.conf . There is another configuration parameter max_parallel_workers that controls the maximum number of parallel workers is allowed to be spawned. The default is 8.

Technically, I can avoid my visibility issues simply by either setting min_parallel_table_scan_size to a huge number, or setting max_parallel_workers to 0. But this is really not my style, I would like to keep all these goodies that PG provides while being able to solve the problem.

To spawn a parallel worker, the psql backend will initialize a parallel worker context in the global process table and a message queue based on shared memory for communication with the backend. Then it sends a signal to postmaster to notify that the global process table has been updated.

When postmaster receives the signal, it will load the global process table and found that it needs to spawn a new parallel worker. It will proceed to fork a new parallel worker according to the context information supplied. This information determines the entry point for the parallel worker and what to do once spawned. During processing, the parallel worker and the psql backend use the message queue to communicate tuples back and forth and finally the psql backend will gather together all the data tuples and produce a final result back to the user.

4. Can We Use GDB to attach This Parallel Worker’s PID When Spawned?

Technically yes, but the life time of this parallel worker may be very short, by the time you see its PID from the ps -ef command, the worker may have already done its job and exited. This means, it is too late for me to start GDB and attach to its PID.

Instead, the technique I am going to show you today will trace the parallel worker from the moment it starts.

5. Tracing the Parallel Worker

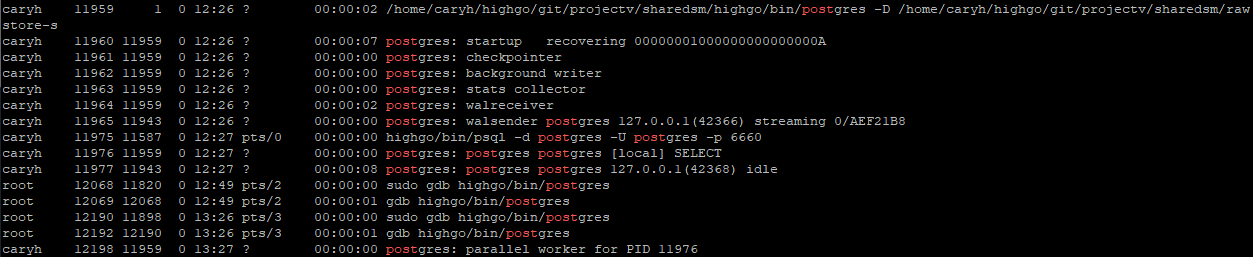
I will be using this instance of PostgreSQL server (version 12.5) as an example where PID 11976 is the psql backend process serving the psql client.

img

Pre-Condition:

Connect psql to the PostgreSQL server, create an example table and inserted about 2.5M rows of data. This will for sure trigger parallel workers.

$ psql -d postgres -U postgres -p 6660
psql (12.5)
Type "help" for help.

postgres=# create table test(a int, b int);
CREATE TABLE
postgres=# insert into test values(generate_series(1,500000),1);
INSERT 0 500000
postgres=# insert into test values(generate_series(1,500000),1);
INSERT 0 500000
postgres=# insert into test values(generate_series(1,500000),1);
INSERT 0 500000
postgres=# insert into test values(generate_series(1,500000),1);
INSERT 0 500000
postgres=# insert into test values(generate_series(1,500000),1);
INSERT 0 500000
postgres=#

Step 1: Attach GDB to the psql backend having PID = 11976 and Set a Break Point

I am setting a break point at the function RegisterDynamicBackgroundWorker. This is called when parallel worker is required to complete the query. Setting a breakpoint allows us more control as to when to proceed with a parallel worker spawn.

gdb postgres
(gdb) attach 11976
(gdb) b RegisterDynamicBackgroundWorker

Step 2: Attach GDB to the Postmaster having PID = 11959 and Set 2 Break Points

We are using a second GDB to attach to the postmaster and set 2 break points there. fork_process is the function before postmaster actually spawns a new parallel worker using the system fork() call. ParallelWorkerMain is the main function for the parallel worker after it has been spawned.

gdb postgres
(gdb) attach 11959
(gdb) b fork_process
(gdb) b ParallelWorkerMain

Step 3: Execute a Large SELECT Query On psql To Trigger the Break Points

postgres=# select count(*) from test;

The RegisterDynamicBackgroundWorker break point will be hit on the first GDB session having attached PID = 11959

Use the continue or c GDB command to continue to spawn the worker

Breakpoint 1, RegisterDynamicBackgroundWorker (worker=0x7ffd867f3c80, handle=0x55a009b77388) at bgworker.c:1002
1002 bool success = false;
(gdb) c
Continuing.

As you continue the first GDB session, the second GDB session will pause due to receipt of a SIGUSR1 signal. This signal tells postmaster to reload the global process table and then spawn a parallel worker. Using the continue command will hit the first break point at fork_process

Program received signal SIGUSR1, User defined signal 1.
0x00007f301b97d0f7 in __GI___select (nfds=5, readfds=0x7ffd867f47d0, writefds=0x0, exceptfds=0x0, timeout=0x7ffd867f4740)
at ../sysdeps/unix/sysv/linux/select.c:41
41 in ../sysdeps/unix/sysv/linux/select.c
(gdb) c
Continuing.

Breakpoint 1, fork_process () at fork_process.c:47
47 fflush(stdout);

(gdb)

Step 4: Tell Postmaster GDB To Follow Child Process Instead Of Parent

At this point, the postmaster GDB is now waiting at the fork_process call, which is right before spawning a parallel worker. This is a good time now to tell GDB to follow the child process instead of staying at parent when the process calls fork(). The reason we want to set this late at this moment is because postmaster is occasionally spawning other backend processes such as walsender and walreceiver. Setting to follow child process early may cause our GDB to follow to another backend process that we are not interested in.

(gdb) set follow-fork-mode child

You may use the continue command after setting it to follow child. Then immediately the GDB will switch to the new child process having PID = 12198 below and hit our second break point ParallelWorkerMain. So, Now the GDB is debugging the parallel worker process instead of the original postmaster.

(gdb) c
Continuing.
[New process 12198]
[Thread debugging using libthread_db enabled]
Using host libthread_db library "/lib/x86_64-linux-gnu/libthread_db.so.1".
[Switching to Thread 0x7f301ca79740 (LWP 12198)]

Thread 2.1 "postgres" hit Breakpoint 2, ParallelWorkerMain (main_arg=1544458234) at parallel.c:1207
1207 {

Step 5: Continue To Debug The Parallel Process

Using the ps -ef | grep postgres command, we can see a new parallel worker being spawned having PID = 12198

img

At this point, you are free to explore the process flow of the parallel worker. For me, I am debugging the visibility issues, so I will set additional break points at HeapTupleSatisfiesMVCC and TransactionIdIsCurrentTransactionId. In your case, you may be debugging some other functionalities.

Being able to debugging into a parallel worker with GDB allows me to see the problems I was having and being able to fix quickly.

If you are having trouble tracing into a parallel workers spawned by PostgreSQL during run time, I hope this blog will be helpful to you.

How to Analyze a PostgreSQL Crash Dump File

1. Introduction

In this blog post, I will talk about how to enable the generation of crash dump file (also known as core dump) and some common GDB commands to help a developer troubleshoot a crash-related issues within PostgreSQL and also other applications. Proper analysis of the issue normally will take time and certain degree of knowledge about the application source code. From experience, sometimes it may be better to look at the bigger environment instead of looking at the point of crash.

2. What is a Crash Dump File?

A crash dump file is a file that consists of the recorded state of the working memory of an application when it crashes. This state is represented by stacks of memory addresses and CPU registers and normally it is extremely difficult to debug with only memory addresses and CPU registers because they tell you no information about the application logic. Considering the core dump contents below, which shows the back trace of memory addresses to the point of crash.

#1  0x00687a3d in ?? ()
#2 0x00d37f06 in ?? ()
#3 0x00bf0ba4 in ?? ()
#4 0x00d3333b in ?? ()
#5 0x00d3f682 in ?? ()
#6 0x00d3407b in ?? ()
#7 0x00d3f2f7 in ?? ()

Not very useful is it? So, when we see a crash dump file that looks like this, it means the application is not built with debugging symbols, making this crash dump file useless. If this is the case, you will need to install the debug version of the application or re-build the application with debugging enabled.

3. How to Generate a Useful Crash Dump File

Before the generation of crash dump file, we need to ensure the application is built with debugging symbols. This can be done by executing the ./configure script like this:

./configure enable-debug

This adds the -g argument to CFLAGS in src/Makefile.global with optimization level set to 2 (-O2). My preference is to also change the optimization to 0 (-O0) so when we are navigating the stack using GDB, the navigation will make much more sense rather than jumping around and we will be able to print out most variables values in memory instead of getting optimized out error in GDB.

CFLAGS = -Wall -Wmissing-prototypes -Wpointer-arith -Wdeclaration-after-statement -Werror=vla -Wendif-labels -Wmissing-format-attribute -Wimplicit-fallthrough=3 -Wformat-security -fno-strict-aliasing -fwrapv -fexcess-precision=standard -Wno-format-truncation -g -O0

Now, we can enable the crash dump generation. This can be done by the user limit command.

ulimit -c unlimited

to disable:

ulimit -c 0

Make sure there is enough disk space because crash dump file is normally very large as it records all the memory execution states from start to crash, and make sure the ulimit is set up in the shell before starting PostgreSQL. When PostgreSQL crashes, a core dump file named core will be generated in $PGDATA

4. Analyzing the Dump File using GDB

GDB (GNU Debugger) is a portable debugger that runs on many Unix-like systems and can work with many programming languages and is my favorite tool to analyze a crash dump file. To demonstrate this, I will intentionally add a line in PostgreSQL source code that will result in segmentation fault crash type when a CREATE TABLE command is run.

Assuming the PostgreSQL has already crashed and generated a core dump file core in this location ~/highgo/git/postgres/postgresdb/core. I would first use the file utility to understand more about the core file. Information such as the kernel info, and the program that generated it.

caryh@HGPC01:~$ file /home/caryh/highgo/git/postgres/postgresdb/core
postgresdb/core: ELF 64-bit LSB core file x86-64, version 1 (SYSV), SVR4-style, from 'postgres: cary cary [local] CREATE TABLE', real uid: 1000, effective uid: 1000, real gid: 1000, effective gid: 1000, execfn: '/home/caryh/highgo/git/postgres/highgo/bin/postgres', platform: 'x86_64'
caryh@HGPC01:~$

The file utility tells me that the core file is generated by this application /home/caryh/highgo/git/postgres/highgo/bin/postgres, so I would execute gdb like this:

gdb /home/caryh/highgo/git/postgres/highgo/bin/postgres -c  /home/caryh/highgo/git/postgres/postgresdb/core

GNU gdb (Ubuntu 8.1-0ubuntu3) 8.1.0.20180409-git
Copyright (C) 2018 Free Software Foundation, Inc.
License GPLv3+: GNU GPL version 3 or later <http://gnu.org/licenses/gpl.html>
This is free software: you are free to change and redistribute it.
There is NO WARRANTY, to the extent permitted by law. Type "show copying"
and "show warranty" for details.
This GDB was configured as "x86_64-linux-gnu".
Type "show configuration" for configuration details.
For bug reporting instructions, please see:
<http://www.gnu.org/software/gdb/bugs/>.
Find the GDB manual and other documentation resources online at:
<http://www.gnu.org/software/gdb/documentation/>.
For help, type "help".
Type "apropos word" to search for commands related to "word"...
Reading symbols from /home/caryh/highgo/git/postgres/highgo/bin/postgres...done.
[New LWP 27417]
[Thread debugging using libthread_db enabled]
Using host libthread_db library "/lib/x86_64-linux-gnu/libthread_db.so.1".
Core was generated by `postgres: cary cary [local] CREATE TABLE '.
Program terminated with signal SIGSEGV, Segmentation fault.
#0 heap_insert (relation=relation@entry=0x7f872f532228, tup=tup@entry=0x55ba8290f778, cid=0, options=options@entry=0,
bistate=bistate@entry=0x0) at heapam.c:1840
1840 ereport(LOG,(errmsg("heap tuple len = %d", heaptup->t_len)));
(gdb)

Immediately after running gdb on the core file, it shows the location of the crash at heapam.c:1840 and that is exactly the line I have intentionally added to cause a crash.

5. Useful GDB Commands

With gdb, it is very easy to identify the location of a crash, because it tells you immediately after running gdb on the core file. Unfortunately, 95% of the time, the location of the crash is not the real cause of the problem. This is why I mentioned earlier that sometimes it may be better to look at the bigger environment instead of looking at the point of crash. The crash is likely caused by a mistake in the application logic some where else in the application before it hits the point of crash. Even if you fix the crash, the mistake in application logic still exists and most likely, the application will crash somewhere else later or yield unsatisfactory results. Therefore, it is worth awhile to understand some of the powerful GDB commands that could help us understand the call stacks better to identify the real root cause.

5.1 The bt (Back Trace) command

The bt command shows a series of call stacks since the beginning of the application all the way to the point of crash. With full debugging enabled, you will be able to see the function arguments and values being passed in to each function calls as well as the source file and line numbers where they were called. This allows developer to travel backwards to check for any potential application logic mistake in the earlier processing.


(gdb) bt
#0 heap_insert (relation=relation@entry=0x7f872f532228, tup=tup@entry=0x55ba8290f778, cid=0, options=options@entry=0,
bistate=bistate@entry=0x0) at heapam.c:1840
#1 0x000055ba81ccde3e in simple_heap_insert (relation=relation@entry=0x7f872f532228, tup=tup@entry=0x55ba8290f778)
at heapam.c:2356
#2 0x000055ba81d7826d in CatalogTupleInsert (heapRel=0x7f872f532228, tup=0x55ba8290f778) at indexing.c:228
#3 0x000055ba81d946ea in TypeCreate (newTypeOid=newTypeOid@entry=0, typeName=typeName@entry=0x7ffcf56ef820 "test",
typeNamespace=typeNamespace@entry=2200, relationOid=relationOid@entry=16392, relationKind=relationKind@entry=114 'r',
ownerId=ownerId@entry=16385, internalSize=-1, typeType=99 'c', typeCategory=67 'C', typePreferred=false,
typDelim=44 ',', inputProcedure=2290, outputProcedure=2291, receiveProcedure=2402, sendProcedure=2403,
typmodinProcedure=0, typmodoutProcedure=0, analyzeProcedure=0, elementType=0, isImplicitArray=false, arrayType=16393,
baseType=0, defaultTypeValue=0x0, defaultTypeBin=0x0, passedByValue=false, alignment=100 'd', storage=120 'x',
typeMod=-1, typNDims=0, typeNotNull=false, typeCollation=0) at pg_type.c:484
#4 0x000055ba81d710bc in AddNewRelationType (new_array_type=16393, new_row_type=<optimized out>, ownerid=<optimized out>,
new_rel_kind=<optimized out>, new_rel_oid=<optimized out>, typeNamespace=2200, typeName=0x7ffcf56ef820 "test")
at heap.c:1033
#5 heap_create_with_catalog (relname=relname@entry=0x7ffcf56ef820 "test", relnamespace=relnamespace@entry=2200,
reltablespace=reltablespace@entry=0, relid=16392, relid@entry=0, reltypeid=reltypeid@entry=0,
reloftypeid=reloftypeid@entry=0, ownerid=16385, accessmtd=2, tupdesc=0x55ba8287c620, cooked_constraints=0x0,
relkind=114 'r', relpersistence=112 'p', shared_relation=false, mapped_relation=false, oncommit=ONCOMMIT_NOOP,
reloptions=0, use_user_acl=true, allow_system_table_mods=false, is_internal=false, relrewrite=0, typaddress=0x0)
at heap.c:1294
#6 0x000055ba81e3782a in DefineRelation (stmt=stmt@entry=0x55ba82876658, relkind=relkind@entry=114 'r', ownerId=16385,
ownerId@entry=0, typaddress=typaddress@entry=0x0,
queryString=queryString@entry=0x55ba82855648 "create table test (a int, b char(10)) using heap;") at tablecmds.c:885
#7 0x000055ba81fd5b2f in ProcessUtilitySlow (pstate=pstate@entry=0x55ba82876548, pstmt=pstmt@entry=0x55ba828565a0,
queryString=queryString@entry=0x55ba82855648 "create table test (a int, b char(10)) using heap;",
context=context@entry=PROCESS_UTILITY_TOPLEVEL, params=params@entry=0x0, queryEnv=queryEnv@entry=0x0, qc=0x7ffcf56efe50,
dest=0x55ba82856860) at utility.c:1161
#8 0x000055ba81fd4120 in standard_ProcessUtility (pstmt=0x55ba828565a0,
queryString=0x55ba82855648 "create table test (a int, b char(10)) using heap;", context=PROCESS_UTILITY_TOPLEVEL,
params=0x0, queryEnv=0x0, dest=0x55ba82856860, qc=0x7ffcf56efe50) at utility.c:1069
#9 0x000055ba81fd1962 in PortalRunUtility (portal=0x55ba828b7dd8, pstmt=0x55ba828565a0, isTopLevel=<optimized out>,
setHoldSnapshot=<optimized out>, dest=<optimized out>, qc=0x7ffcf56efe50) at pquery.c:1157
#10 0x000055ba81fd23e3 in PortalRunMulti (portal=portal@entry=0x55ba828b7dd8, isTopLevel=isTopLevel@entry=true,
setHoldSnapshot=setHoldSnapshot@entry=false, dest=dest@entry=0x55ba82856860, altdest=altdest@entry=0x55ba82856860,
qc=qc@entry=0x7ffcf56efe50) at pquery.c:1310
#11 0x000055ba81fd2f51 in PortalRun (portal=portal@entry=0x55ba828b7dd8, count=count@entry=9223372036854775807,
isTopLevel=isTopLevel@entry=true, run_once=run_once@entry=true, dest=dest@entry=0x55ba82856860,
altdest=altdest@entry=0x55ba82856860, qc=0x7ffcf56efe50) at pquery.c:779
#12 0x000055ba81fce967 in exec_simple_query (query_string=0x55ba82855648 "create table test (a int, b char(10)) using heap;")
at postgres.c:1239
#13 0x000055ba81fd0d7e in PostgresMain (argc=<optimized out>, argv=argv@entry=0x55ba8287fdb0, dbname=<optimized out>,
username=<optimized out>) at postgres.c:4315
#14 0x000055ba81f4f52a in BackendRun (port=0x55ba82877110, port=0x55ba82877110) at postmaster.c:4536
#15 BackendStartup (port=0x55ba82877110) at postmaster.c:4220
#16 ServerLoop () at postmaster.c:1739
#17 0x000055ba81f5063f in PostmasterMain (argc=3, argv=0x55ba8284fee0) at postmaster.c:1412
#18 0x000055ba81c91c04 in main (argc=3, argv=0x55ba8284fee0) at main.c:210
(gdb)

5.1 The f (Fly) command

The f command followed by a stack number allows gdb to jump to a particular call stack listed by the bt command and allows you to print other variable in that particular stack. For example:

(gdb) f 3
#3 0x000055ba81d946ea in TypeCreate (newTypeOid=newTypeOid@entry=0, typeName=typeName@entry=0x7ffcf56ef820 "test",
typeNamespace=typeNamespace@entry=2200, relationOid=relationOid@entry=16392, relationKind=relationKind@entry=114 'r',
ownerId=ownerId@entry=16385, internalSize=-1, typeType=99 'c', typeCategory=67 'C', typePreferred=false,
typDelim=44 ',', inputProcedure=2290, outputProcedure=2291, receiveProcedure=2402, sendProcedure=2403,
typmodinProcedure=0, typmodoutProcedure=0, analyzeProcedure=0, elementType=0, isImplicitArray=false, arrayType=16393,
baseType=0, defaultTypeValue=0x0, defaultTypeBin=0x0, passedByValue=false, alignment=100 'd', storage=120 'x',
typeMod=-1, typNDims=0, typeNotNull=false, typeCollation=0) at pg_type.c:484
484 CatalogTupleInsert(pg_type_desc, tup);
(gdb)

This forces gdb to jump to stack number 3, which is at pg_type.c:484. In here, you can examine all other variables in this frame (in function TypeCreate).

5.2 The p (Print) command

The most popular command in gdb, which can be used to print variable addresses and values

(gdb) p tup
$1 = (HeapTuple) 0x55ba8290f778
(gdb) p pg_type_desc
$2 = (Relation) 0x7f872f532228

(gdb) p * tup
$3 = {t_len = 176, t_self = {ip_blkid = {bi_hi = 65535, bi_lo = 65535}, ip_posid = 0}, t_tableOid = 0,
t_data = 0x55ba8290f790}

(gdb) p * pg_type_desc
$4 = {rd_node = {spcNode = 1663, dbNode = 16384, relNode = 1247}, rd_smgr = 0x55ba828e2a38, rd_refcnt = 2, rd_backend = -1,
rd_islocaltemp = false, rd_isnailed = true, rd_isvalid = true, rd_indexvalid = true, rd_statvalid = false,
rd_createSubid = 0, rd_newRelfilenodeSubid = 0, rd_firstRelfilenodeSubid = 0, rd_droppedSubid = 0,
rd_rel = 0x7f872f532438, rd_att = 0x7f872f532548, rd_id = 1247, rd_lockInfo = {lockRelId = {relId = 1247, dbId = 16384}},
rd_rules = 0x0, rd_rulescxt = 0x0, trigdesc = 0x0, rd_rsdesc = 0x0, rd_fkeylist = 0x0, rd_fkeyvalid = false,
rd_partkey = 0x0, rd_partkeycxt = 0x0, rd_partdesc = 0x0, rd_pdcxt = 0x0, rd_partcheck = 0x0, rd_partcheckvalid = false,
rd_partcheckcxt = 0x0, rd_indexlist = 0x7f872f477d00, rd_pkindex = 0, rd_replidindex = 0, rd_statlist = 0x0,
rd_indexattr = 0x0, rd_keyattr = 0x0, rd_pkattr = 0x0, rd_idattr = 0x0, rd_pubactions = 0x0, rd_options = 0x0,
rd_amhandler = 0, rd_tableam = 0x55ba82562c20 <heapam_methods>, rd_index = 0x0, rd_indextuple = 0x0, rd_indexcxt = 0x0,
rd_indam = 0x0, rd_opfamily = 0x0, rd_opcintype = 0x0, rd_support = 0x0, rd_supportinfo = 0x0, rd_indoption = 0x0,
rd_indexprs = 0x0, rd_indpred = 0x0, rd_exclops = 0x0, rd_exclprocs = 0x0, rd_exclstrats = 0x0, rd_indcollation = 0x0,
rd_opcoptions = 0x0, rd_amcache = 0x0, rd_fdwroutine = 0x0, rd_toastoid = 0, pgstat_info = 0x55ba828d5cb0}
(gdb)

With the asteroid, you can tell the p command to either print the address of a pointer or the values pointed by the pointer.

5.3 The x (examine) command

The x command is used to examine a memory block contents with specified size and format. The following example tries to examine the t_data values inside a HeapTuple structure. Note that we first print the *tup pointer to learn the size of t_data is 176, then we use the x command to examine the first 176 bytes pointed by t_data

(gdb)  p *tup
$6 = {t_len = 176, t_self = {ip_blkid = {bi_hi = 65535, bi_lo = 65535}, ip_posid = 0}, t_tableOid = 0,
t_data = 0x55ba8290f790}

(gdb) p tup->t_data
$7 = (HeapTupleHeader) 0x55ba8290f790
(gdb) x/176bx tup->t_data
0x55ba8290f790: 0xc0 0x02 0x00 0x00 0xff 0xff 0xff 0xff
0x55ba8290f798: 0x47 0x00 0x00 0x00 0xff 0xff 0xff 0xff
0x55ba8290f7a0: 0x00 0x00 0x1f 0x00 0x01 0x00 0x20 0xff
0x55ba8290f7a8: 0xff 0xff 0x0f 0x00 0x00 0x00 0x00 0x00
0x55ba8290f7b0: 0x0a 0x40 0x00 0x00 0x74 0x65 0x73 0x74
0x55ba8290f7b8: 0x00 0x00 0x00 0x00 0x00 0x00 0x00 0x00
0x55ba8290f7c0: 0x00 0x00 0x00 0x00 0x00 0x00 0x00 0x00
0x55ba8290f7c8: 0x00 0x00 0x00 0x00 0x00 0x00 0x00 0x00
0x55ba8290f7d0: 0x00 0x00 0x00 0x00 0x00 0x00 0x00 0x00
0x55ba8290f7d8: 0x00 0x00 0x00 0x00 0x00 0x00 0x00 0x00
0x55ba8290f7e0: 0x00 0x00 0x00 0x00 0x00 0x00 0x00 0x00
0x55ba8290f7e8: 0x00 0x00 0x00 0x00 0x00 0x00 0x00 0x00
0x55ba8290f7f0: 0x00 0x00 0x00 0x00 0x98 0x08 0x00 0x00
0x55ba8290f7f8: 0x01 0x40 0x00 0x00 0xff 0xff 0x00 0x63
0x55ba8290f800: 0x43 0x00 0x01 0x2c 0x08 0x40 0x00 0x00
0x55ba8290f808: 0x00 0x00 0x00 0x00 0x09 0x40 0x00 0x00
0x55ba8290f810: 0xf2 0x08 0x00 0x00 0xf3 0x08 0x00 0x00
0x55ba8290f818: 0x62 0x09 0x00 0x00 0x63 0x09 0x00 0x00
0x55ba8290f820: 0x00 0x00 0x00 0x00 0x00 0x00 0x00 0x00
0x55ba8290f828: 0x00 0x00 0x00 0x00 0x64 0x78 0x00 0x00
0x55ba8290f830: 0x00 0x00 0x00 0x00 0xff 0xff 0xff 0xff
0x55ba8290f838: 0x00 0x00 0x00 0x00 0x00 0x00 0x00 0x00
(gdb)

7. Conclusion

In this blog, we have discussed about how to generate a useful crash dump file with sufficient debug symbols to help developers troubleshoot a crash issue in PostgreSQL and also in other applications. We have also discussed about a very powerful and useful debugger gdb and shared some of the most common commands that can be utilized to troubleshoot a crash issue from a core file. I hope the information here can help some developers out there to troubleshoot issues better.

Trace-Postgres-query-processing-internals-with-debugger

1. Overview

In this article we will use GDB debugger to trace the internals of Postgres and observe how an input query passes through several levels of transformation (Parser -> Analyzer -> Rewriter -> Planner -> Executor) and eventually produces an output.

This article is based on PG12 running on Ubuntu 18.04, and we will use a simple SELECT query with ORDER BY , GROUP BY, and LIMIT keywords to go through the entire query processing tracing.

Your browser is out-of-date!

Update your browser to view this website correctly. Update my browser now

×