How to Set Up NFS and Run PG on it

Introduction

Network File System (NFS) is a distributed file system protocol that allows a user on a client node to access files residing on a server node over network much like local storage is accessed. Today in this blog, I will share how to set up both NFSv4 server and client on CentOS7 and run PG on it.

NFS Server

First, install the NFS server components by

yum install nfs-utils

This will install nfs process on the server machine in which we can go ahead to enable and start the NFS server

systemctl enable nfs
systemctl start nfs

Create a directory that will be mounted by NFS clients

mkdir /home/myserveruser/sharedir

In /etc/exports, add a new record like below

/home/myuser/sharedir	X.X.X.X(rw,sync,no_subtree_check,no_root_squash)

This line is allowing a client having IP address of X.X.X.X to mount the directory at /home/myserveruser/sharedir and can do read and write as specified by rw option. For all possible options, refer to the blog here for definition of each options used. This directory will be used to initialized PostgreSQL database cluster by a NFS client over the network.

If more than one client/host will mount the same directory, you will need to include them in /etc/exports as well.

/home/myuser/sharedir	X.X.X.X(rw,sync,no_subtree_check,no_root_squash)
/home/myuser/sharedir A.A.A.A(rw,sync,no_subtree_check,no_root_squash)
/home/myuser/sharedir B.B.B.B(rw,sync,no_subtree_check,no_root_squash)

Then, we are ready to restart the NFS service to take account the new changes in /etc/exports

systemctl restart nfs

Record the userid and groupid of the user associated with the directory to be exported to client. For example, userid = 1009, groupid = 1009

id myuser

You may also want to ensure that the firewall on centos7 is either disabled or set to allow the NFS traffic to passthrough. You can check the firewall status and add new port to be allowed with the following commands:

sudo firewall-cmd --zone=public --list-all
firewall-cmd --permanent --zone=public --add-port=2049/tcp
firewall-cmd --permanent --zone=public --add-port=2049/udp
firewall-cmd --reload

NFS Client

First, install the NFS client components by

yum install nfs-utils

Create a directory on the client side that will be used as the mount point to the NFS server

mkdir /home/myserveruser/sharedir

Since PostgreSQL cannot be run as root user, we need a way to mount the remote NFS without root privileges. To do that, we need to add one more entry in /etc/fstab

Y.Y.Y.Y:/home/myserveruser/sharedir		/home/myclientuser/mountpoint	nfs 	rw,noauto,user 0 0

where Y.Y.Y.Y is the IP address of the NFS server that client will connect to, nfs is the type of file system we will mount as, rw means read and write, noauto means the mount point will not be mounted automatically at system startup and user means this mount point can be mounted by a non-root user.

With this new line added to /etc/fstab, you could try mounting it using mount -a command or simply do a reboot

Now, we need to match the userid and groupid of myserveruser on the NFS server side and myclientuser on the NFS side. The user names do not have to be equal, but the userid and groupid must be equal to have the correct permission to access the mounted directory,

To set the userid and groupid of the myclientuser:

usermod -u 1009 myclientuser
groupmod -u 1009 myclientuser

where 1009 is recorded on the NFS server side by the id command.

Please note that the above commands will change the property of the specified user and that will also cause the tool to iteratively change all the files under /home/myclientuser to be the same property given that it is owned by the specified user. This process may take a long time to complete. if you have a huge amount of data there, I would recommend creating a new user instead of changing the userid and groupid. Please note that files outside of specified user’s /home directory will not be changed the properly, which means current user can no longer access them once userid and groupid have been changed.

With all the setup in place, we are now ready to mount NFS:

$ mount /home/clientuser/mountpoint;

and the folder mountpoint on NFS client side will now reflect to sharedir folder on the NFS server

Finally, we can initialize a new database cluster on the mountpoint on the NFS client side

$ initdb -D /home/clientuser/mountpoint

and the initial database files should be physically stored on the NFS server side instead of NFS client. This may take longer than usual because the file I/Os are now done over the network via NFS.
Maintain a custom PG to PG Connection With libpq's COPY protocol

1. Introduction

Recently in my development work, a custom connection is required to be maintained between a PG backend on primary and another PG backends on standby nodes to communicate custom data in addition to the existing walsender/walreceiver connection that streams WAL data. Of course, I could just create a new standalone backend and maintain a socket connection myself to communicate custom data. Technically, It could work, but it also created several problems. the persistence, user security, data encryption of this custom connection all need to be handled as well. So, why not just use libpq to handle all of these for us? Today, in this blog, I will share my experience with using libpq COPY protocol to maintain a custom connection for custom data based on PG14.

2. Create new routines in libpqwalreceiver.c

This file is located in src/backend/replication/libpqwalreceiver and is compiled as a shared library (.so) that contains routines related to libpq library that allows a PG backend to use libpq without having it compiled in the backend code. When a PG backend process needs to use libpq, it needs to load the shared library first using load_file() call.

My requirement is simple, the new routines I needed are connect, send, recv, similar to normal socket interactions. I do not have a close function defined here, because I would like the connection to be persisted as long as the primary and standby are running. When one of them exits, the connection will be automatically terminated once it has detected the peer has disconnected.

3. The Connect Routine

Unlike the libpqrcv_connect routine for replication, my case is much simpler. I just need my standby node to connect to the primary node, so I can simply reuse standby’s primary_conninfo configuration parameter to connect. This will trigger the primary node to fork a new backend process to serve this connection. A code snipper could look like this:

connect

I also set my libpq socket connection to use blocking socket and set asyncStatus to be PGASYNC_COPY_BOTH to indicate that I will be doing a bidirectional data communication

4. The Send Routine

My send routine is exactly the same to the libpqrcv_send routine for replication. Both uses PQputCopyData to send streams of data out to the primary. Renamed it for consistency. Snippet below:

send

5. The Recv Routine

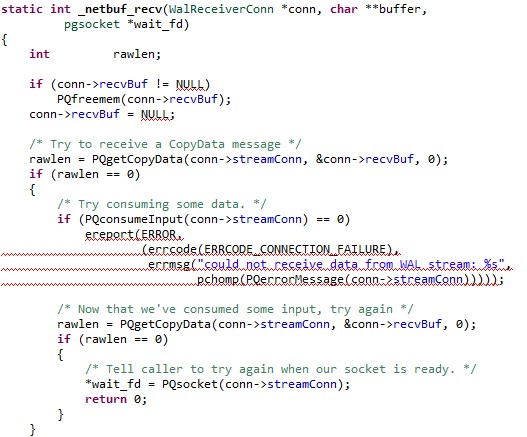
Also, very similar to libpqrcv_recv routine for replication, it shares almost exactly the same code. Except that for my requirement, the connection needs to be a synchronous connection. This means that my standby will block while waiting for primary to respond. In order to make recv synchronous, I had to pass a 0 to the third argument of PQgetCopyData. So, if you are okay with asynchronous connection, this routine could look exactly the same as libpqrcv_recv as well.

recv

6. Having Standby to Send Out Some Custom Data

Now that we have the libpq wrapper routines made for our own purpose, we can then have the standby sends some custom data to the primary and waits for a response. Note that I am sending a letter ‘N’ followed by 3 example custom data, 100, 200, 300. Libpq COPY uses the letter d to indicate a COPY command, and what we are doing here is to wrap our own commands within the d command

StringInfoData buf_blk_request;
WalReceiverConn *wrconn;
int len;

load_file("libpqwalreceiver", false);


wrconn = netbuf_connect("dbname=postgres host=127.0.0.1 port=5550");


initStringInfo(&buf_blk_request);
pq_sendbyte(&buf_blk_request, 'N');
pq_sendint32(&buf_blk_request, 100);
pq_sendint32(&buf_blk_request, 200);
pq_sendint32(&buf_blk_request, 300);
pq_flush();

/* Send it */
netbuf_send(wrconn, buf_blk_request.data, buf_blk_request.len);

/* Read the data */
len = netbuf_recv(wrconn, &tmp, &fd);
if (len > 0)
{
/*
* Something was received from primary
*/
}

7. Having Primary to Receive the Custom Data

When we send something using the methods above, the primary’s postmaster’s main loop will receive the data and decide what to do. Because we are using COPY protocol, the first character is d, in which src/backend/tcop/postgres.c already has a handler for that. So we will need to add additional code under the d handler in postgres.c to receive and process the data sent by standby and provide a response if needed.

case 'd':			/* copy data */
elog(DEBUG2, "copy data request received");
int op;

op = pq_getmsgbyte(&input_message);
if (op == 'N')
{
StringInfoData buf_blk_reply;
int data1, data2, data3;

/* receive custom data here */
data1 = pq_getmsgint(&input_message, 4);
data2 = pq_getmsgint(&input_message, 4);
data3 = pq_getmsgint(&input_message, 4);
pq_getmsgend(&input_message);


/* send another custom data back to standby here */
pq_beginmessage(&buf_blk_reply, 'd');
pq_sendint32(&buf_blk_request, 400);
pq_sendint32(&buf_blk_request, 500);
pq_sendint32(&buf_blk_request, 600);
pq_endmessage(&buf_blk_reply);
pq_flush();
}
break;

8. Summary

Based on libpq COPY, I have created a separate communication channel between a primary and standby node that can be used to communicate custom data similar to how you would normally handle a regular socket. All this is based on the COPY protocl that libpq already supports and within that protocol, we wrap our own data. In the above examples, when standby sends 100, 200, 300 to the primary, it is able to receive it and respond 400, 500, 600. This simple example can be expanded to support other things that you may need in your development. This way of using COPY for my own purpose may not be the cleanest way, but it is what works for me.

Understand PG's MVCC Visibility Check Rules

1. Introduction

PostgreSQL’s MultiVersion Concurrency Control (MVCC) is an “advanced technique for improving database performance in a multi-user environment” according to Vadim Mikheev. This technique requires multiple “versions” of the same data tuple exist in the system governed by snapshots taken during different time periods. In other words, under such technique, it is PG’s responsibility to figure out how many tuples are visible to the user and how many are not, according to multiple parameters such as snapshots taken, current transaction ID…etc. This is also known as visibility check rules in PG and today in this blog, I will talk about the basic principles of visibility check so you get an idea how PG performs this task internally and I hope it would be helpful in your development work.

2. Parameters Involved?

  • The tuple itself, which contains:
    • xmin (the transaction ID that inserts this tuple)
    • xmax (the transaction ID that deletes this tuple if > 0, otherwise it’s not deleted)
    • cid (command ID)
    • hintbit
  • Global top transaction ID if available
  • current snapshot, which also contains xmin, xmax and cid
  • Commit Log Data (CLOG)

3. The Process

3.1 Check the Hintbit

The visibility process starts by checking the hintbit. If hintbit has a state of COMMITTED, then we can skip most of the other visibility checking rules for better efficiency. With the tuple committed, PG then take this tuple’s xmin value to check with the current snapshot to ensure this tuple is not currently in progress. (See 3.3 below for formula to determine in progress). This check is required because there is a chance that this tuple, though committed, is still being updated by other backend processes at this very moment. If the tuple is not currently in progress by other backends, it will finally check its xmax value to ensure that it is invalid. Invalid means it has not been deleted. When all of the above are true, this tuple is considered visible.

If hintbit indicates ABORTED, then this tuple is considered invisible to user. If hintbit has no value, then PG should continue with the rest of visibility check rules.

3.2 Check If Tuple’s xmin Equal to Global Top Transaction ID

The next check involves taking tuple’s xmin and compare with global top transaction ID to see if they are equal. This global top transaction ID will only be set when user starts the transaction manually with begin clause. If user does not starts the transaction this way (no begin clause is issued), then this global top transaction ID will not be set and therefore this checking will be skipped.

If tuple xmin equals global top transaction ID, this means the tuple is currently in progress by the current backend, not others. This is where the command ID (cid) will be used to determine the visibility. Within a transaction block, each command issued has an associated command ID to indicate what command comes first and what comes later. For example, if a SELECT comes after an UPDATE, within a transaction, then the SELECT must see the new tuple updated by the previous UPDATE clause and cid plays a part in this determination. This behavior is also governed by the isolation level which is unfortunately out of scope of this blog. The default isolation level is READ COMMITTED, which makes the SELECT sees the data changed by previous UPDATE; but if the isolation is set to REPEATABLE READ then the SELECT will not see the data changed by previous UPDATE. Please keep this in mind.

If tuple’s xmin does not equal to global top transaction ID, then PG should continue with the rest of visibility

3.3 Check the Current Snapshot

The next check involves the PG to check if this tuple is currently in progress by other backend processes. This is done by comparing the tuple’s xmin value against current snapshot’s xmin and xmax values according to this formula.

  • tuple xmin < snapshot xmin = not in progress
  • tuple xmin >= snapshot xmax = in progress

If this tuple is considered in progress by the snapshot, then this tuple must not be visible to the current user because other backends are still working on it. If this tuple is NOT considered in progress, then PG should continue with the rest of visibility check rules.

3.4 Check the Commit Log (CLOG)

This next check involves the PG to take tuple’s xmin to check against the CLOG to see if this tuple has been committed or aborted. CLOG is like an array of transaction IDs and each array element stores a commit status. PG has a formula to convert a transaction ID into a CLOG block plus an offset to precisely access the right CLOG element. This CLOG data structure is regularly flushed to disk with checkpoint process and it is located in these 3 directories: pg_xact, pg_multixact and pg_subtrans.

If CLOG says the given tuple is committed, then PG will continue to check the tuple’s xmax value to ensure that it is invalid. Invalid means it has not been deleted and therefore it is visible to user. At the same time, PG will also update the hintbit value of this tuple to COMMITTED such that in the next visibility checking, PG will not access CLOG again, which is rather expensive.

If CLOG says the given tuple is aborted or invalid, then this tuple is not visible to the current user. At the same time, it will also update the hintbit value of this tuple to INVALID

Summary

The above processes are the very basic visibility rules within PG according to my understanding. Of course there are other complex checking not mentioned here, such as the involvement of sub transactions and multi transactions, but they do follow somewhat similar pattern to what’s mentioned today. I hope this blog would be helpful for you.

Atomic Commit with 2 Phase Commit in FDW Distributed Setup

1. Introduction

PostgreSQL’s 2 phase commit (2PC) feature allows a database to store the details of a transaction on disk without committing it. This is done by issuing PREPARE TRANSACTION [name] command at the end of a transaction block. When the user is ready to commit, he/she can issue COMMIT PREPARED [name] where [name] should match the [name] in PREPARE TRANSACTION command. Because the transaction details are stored on disk with 2PC, the server is able to commit this transaction at a later time even if it crashes or out of service for some time. In a single database instance, the use of 2PC is not critical; the plain ‘commit’ can perform the job equally as well. However, in a larger setup, the data may be distributed on 2 or more database instances (for example, via Foreign Data Wrapper (FDW)), the use of 2PC is absolutely critical here to keep every database instance in sync.

2. Atomic Commit Problem with Foreign Data Wrapper (FDW)

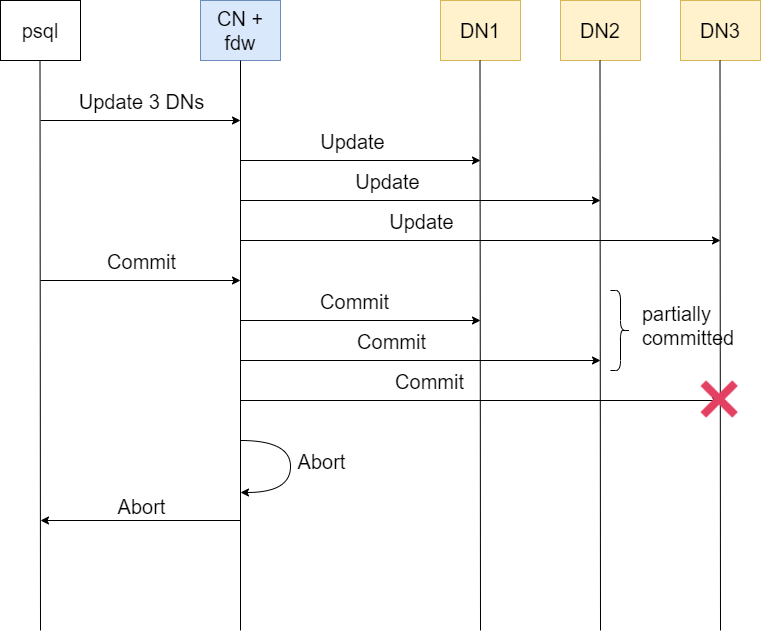
Current postgres_fdw does not support the use of 2PC to commit foreign server. When a commit command is sent to the main server, it will send the same commit command to all of the foreign servers before processing the commit for itself. If one of the foreign node fails the commit, the main server will go through a abort process and will not commit itself due to the failure. However, some of the foreign nodes could already been successfully committed, resulting in a partially committed transaction.

Consider this diagram:

where the CN node fails the commit to DN3 and goes through a abort process, but at the same time, DN1 and DN2 have already been committed successfully and can no longer be rollbacked. This scenario creates a partial commit that may not be desirable.

3. FDW with 2PC Capability

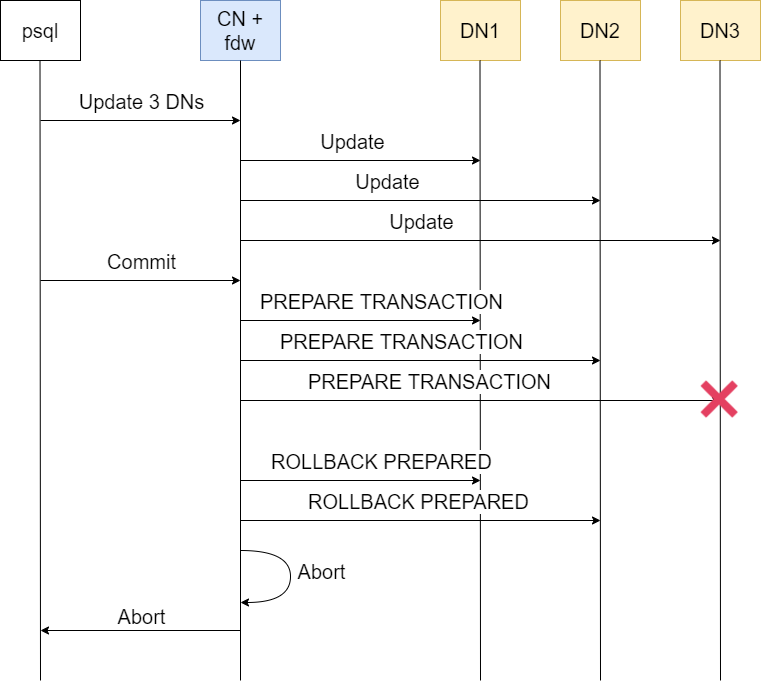
If we were to add a 2PC functionality to current postgres_fdw, instead of sending the same commit to all foreign servers, we let the main server to send PREPARE TRANSACTION instead. The main server should proceed to send COMMIT PREPARE to all foreign servers Only when all of the foreign servers have successfully completed the PREPARE TRANSACTION. If one of them fails at the PREPARE stage, the main server is still able to ROLLBACK those foreign server who have successfully prepared.

Consider this diagram:

where the CN node fails the PREPARE TRANSACTION to DN3 and sends ROLLBACK PREPARED to DN1 and DN2 before going to the abort process. With the 2PC method, there will not be any partial commits.

3. Handling COMMIT PREPARED Failure?

If a foreign server fails at the PREPARE stage, it is not too late to rollback the rest of foreign servers that have succeeded the PREPARE, so the main server can still send ROLLBACK PREPARED to the foreign servers. However, if a foreign server fails at the COMMIT PREPARE stage, the other foreign servers who have succeeded it can no longer be rollbacked, potentially causing a partial commit as well.

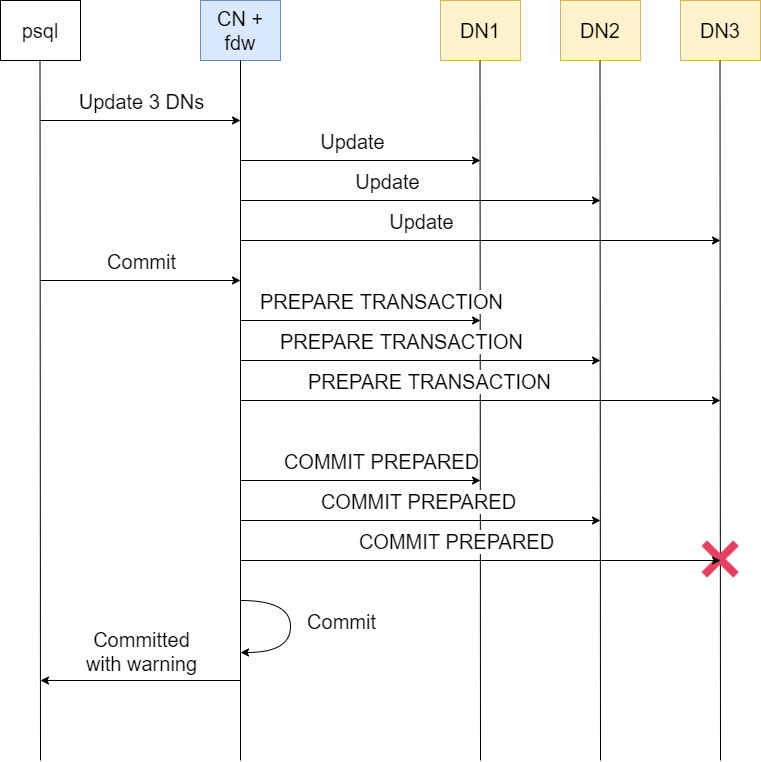
In our implementation, we still allow the main server to continue with the commit even though a foreign server fails COMMIT PREPARED. In addition, we give user a warning about one of the foreign server may not have committed successfully, which leads to a potential partial commit. The foreign server with a failed COMMIT PREPARE will now have something called a “orphaned prepared transaction” that has yet to be committed.

Consider this diagram:

where DN3 fails a COMMIT PREPARED command and the CN node continues the commit with warning.

4. Handling Orphaned Prepared Transaction

Following the above example, if we perform a SELECT query, we will see that DN3 does not have an updated value while DN1 and DN2 have been updated. Also, DN3 still have the transaction prepared and stored in its disk. What’s left to do is to have somebody to login to DN3 and manually run a COMMIT PREPARED command. If that is done successfully, there will no longer be a partial commit.

The way we handle this is to make a orphaned prepared transaction detector at each foreign server and we introduce an intermediate and external global transaction manager (GTM) node that records all the FDW operations. Again, following the above example, when DN3 detects a orphaned prepare transaction, it will make a connection to the GTM node and check if this prepared transaction comes from a CN node. If it is, then we simply let DN3 do a self-commit of the prepared transaction automatically, without any human intervention. If GTM does not have a record, then this orphaned prepared transaction must be created manually by another DN3 user and it should not do anything to it except to just give a warning in the log file.

This is the general concept how we handle atomic commit and orphaned prepared transactions. There may be better and more complex solutions out there but for us, having an intermediate GTM node to coordinate all the operations between CN and DN nodes seems to be the simplest.

Distributed Database With PostgreSQL - Atomic Commit Problems

1. Introduction

If you are into distributed database research, especially one that is setup using Foreign Data Wrapper (FDW) + partitioned foreign tables, you probably have heard that there are many potential issues associated with this setup. Atomic commit, atomic visibility and global deadlock detection are one of the most popular issues that one can encounter in a distributed database environment.

There has been a lot of discussion on the PostgreSQL community on atomic commit and potential ways to solve this problem, and also discuss how this issue introduces an atomic visibility issue.

I recently had a chance to scan through several of the community discussion on atomic commit and would like to share what I have learned in this blog.

2. The problem

In a distributed environment, if a query involves modification to multiple foreign tables (or shards), current PostgreSQL cannot guarantee either all of them commit or all of them rollback. This means that, if one of them fails to commit for some reason but the rest have succeeded, we will see inconsistent results. The desired behavior would be that if one of the foreign tables fails to commit, PostgreSQL should be able to roll back the ones that have been committed successfully.

However, with the current postgres_fdw and the transaction manager, it is currently not possible to “uncommit” a foreign transaction that has been committed. This is why most of the discussions generally regard PG’s “2 Phase Commit” as the basic building block to achieve atomic commit.

2. 2 Phase Commit (2PC)

2PC basically splits a regular commit action into 2 stages, a PREPARE TRANSACTION and a COMMIT PREPARED (or ROLLBACK PREPARED) stage. Doing this allows PG to uncommit an in-progress commit in case it finds a condition that all of the foreign transactions need to be aborted.

For example, 1 Coordinator Node (CN) sends a UPDATE query to 3 Data Nodes (DNs) and would like to commit

  • CN sends a PREPARE TRANSACTION to each DN1 and waits for response
  • CN sends a PREPARE TRANSACTION to each DN2 and waits for response
  • CN sends a PREPARE TRANSACTION to each DN3 and waits for response

If any of these PREPARE TRANSACTION (say DN3) fails to deliver or its response contains error, CN still has a chance to ROLLBACK transactions on DN1 and DN2 and DEALLOCATE the existing prepared transaction. After that, the CN will abort the local transaction and finish the transaction with error and nothing gets changed here.

Only if all 3 DNs have confirmed the PREPARE TRANSACTION success, CN can then proceed to commit the local transaction, if local succeeds, continue to send COMMIT PREPARED to each DN, or send ROLLBACK PREPARED if local fails

  • CN sends a COMMIT/ROLLBACK PREPARED to each DN1 and waits for response
  • CN sends a COMMIT/ROLLBACK PREPARED to each DN2 and waits for response
  • CN sends a COMMIT/ROLLBACK PREPARED to each DN3 and waits for response

If any of these fails to COMMIT PREPARED at this point, say (DN3), CN is not able to uncommit DN1 and DN2 that have been 2-phase committed, so at this point, CN can only retry indefinitely to deliver COMMIT PREPARED to DN3 to ensure atomicity. If DN3 is unreachable, CN will keep on trying forever without closing the transaction and leaving the client waiting.

If client choose to cancel the transaction by hitting ctrl-c, then the transaction will close with a warning message that DN3 has not confirmed a COMMIT PREPARED message and data may be inconsistent. DN3 at this point may have an orphaned prepared transaction that needs to be handled.

3. Orphaned Prepared Transaction

In the previous example, an orphaned prepared transaction can happen if CN prepares a foreign transaction but never has a chance to commit it (possibly due to network). In this case, the DN node can very easily detect an orphaned prepared transaction based on the time the prepared transaction has been created. Unfortunately, without a centralized Global Transaction Manager (GTM), DN node is not able to decide if this orphaned prepared transaction should be committed or discarded. Therefore, most of the solutions on the community only support the detection of orphaned prepared transaction without any handling.

4. How Atomic Visibility Appeared?

Using 2PC allows CN node to rollback a commit during the PREPARE stage but cannot allow rollback during the commit prepared stage, so it can only retry forever or exit with a warning. The visibility issue can happen in a case where DN1 and DN2 have already comitted the prepared transactions while DN3 has not yet committed. At this point, if a client does a SELECT statement across DN1, DN2 and DN3, it will see that DN3 still does not have the right data but DN1 and DN2 have. This is not atomic at all.

To solve this, several people proposed a snapshot that can be shared globally across all the DN and CN nodes. The standard PG’s snapshot is purely based on transaction ID to determine if a tuple is visible or not, but with multiple different PG servers, each of them have their own transaction ID range and could all be very different, so sharing a snapshot based on transaction ID is impossible.

This is why a Commit Sequence Number (CSN) snapshot is being proposed in the discussion, which is based on time, and could be made the same in all of the CN and DN nodes and act as a reference point to determine if a tuple belongs to the past or future. The problem is then shifted to how to ensure all of the CN and DN nodes have consistently the same time? Even the best clock chipsets are subject to time skewing and will slowly go out of sync. The concept of Clock-SI is then added to the discussion, which is designed to handle such a clock skew. This makes the discussion somewhat more complicated and out of scope.

But for me, this may not be worth the effort to completely solve the atomic visibility issue with all these complicated stuff.

5. reference to some of the discussions

Transactions involving multiple servers
Proosal for CSN based snapshot
Global snapshot

Your browser is out-of-date!

Update your browser to view this website correctly. Update my browser now

×

is sure that it is communicating with the right entity instead of a rogue server. SSH tunneling is also a common option to secure a psql connection when TLS is not fully set up. SSH tunneling is also very secure as each connection forces client and server to generate and agree on an encryption key that is valid only for that session. Furthermore, SSH tunneling can be made more secured by setting up the public and private key pair between client and server to ensure the authenticity of the two entities.

3.2 Data Security

This is the security between PostgreSQL and the disk in which it writes data to. This security type is often refereed as a “Cluster Data Encryption” or “Transparent Data Encryption”. Current version of PostgreSQL does not support this feature but there is a handful of talented people working on this feature right now. This security is designed to prevent data compromises directly done on the hard disk. By encrypting the data on the disk, hard disk theft will not be able to extract useful information from the hard disk.

3.3 Network Security

This is the security that most likely will involve a firewall in between a connecting client and a server. The purpose of a firewall is to block most of the malicious connections coming from the public network and prevent unauthorized access to the server. Most advanced firewalls such as an IPS can block DOS attacks and perform deep packet examination according to a database of known malicious packet and attacks. There are also firewalls such as an IDS that perform network monitoring only and will raise alert to the operator should it detects an attack attempt.

3.4 Vulnerability

This is the security that is mostly caused by a software bug that allows an attacker to take advantage of the server, steal data, or simply out a stop to the server and cause damage. The best way to prevent this is upgrade your PostgreSQL server to the latest version that has addressed most of the known vulnerabilities.

3.5 User Security

This is the security that relates mostly to the user management, sometimes called a Role-Based Access Control (RBAC). This is where a database administrator is managing each database user and setting the right privileges for the right users. Excessive privileges, weak passwords and privilege abuses are very common if not done correctly. Make sure the right users get the right privileges and use a third party authentication servers such as LDAP or Kerberos instead of simple passwords can significantly increase the security ratings of your database infrastructure.

Using GDB To Trace Into a Parallel Worker Spawned By Postmaster During a Large Query

Using GDB To Trace Into a Parallel Worker Spawned By Postmaster During a Large Query

1. Introduction

I am working on a new PostgreSQL feature that redefines the way a tuple’s visibility status is determined. The feature is working very nicely until I start doing a large SELECT query, which triggers PostgreSQL to spawn multiple parallel workers to process the request. When this happens, the feature I am working on start to yield incorrect results. A good portion of the data tuples returned are missing because they are considered as invisible, while some portion of it remains visible. It immediately came to my attention that the new feature I am working on does not work in parallel worker mode and somehow I need to find a way to debug into a spawned parallel worker to examine how it is computing the visibility and what is missing inside.

In this blog, I would like to share with you how I use GDB to debug and trace into a new parallel worker spawned by Postmaster in order to fix the visibility issue.

2. GDB Basics

I wrote another blog previously that shows how to use GDB to trace and debug a PostgreSQL issues and share some of the most common commands that I use every day to resolve software issues. If you are new to GDB, I suggest giving this blog a read here

3. How and When does PG Spawn A New Parallel Worker

When you use psql to connect to a PostgreSQL database, it will spawn a new backend worker process to serve this connecting client. Most of the queries you provide will be processed by this backend process, includes SELECT, UPDATE, INSERT…etc. By default, if your SELECT query will require doing a sequential scan over 8MB of data, it will try to use a parallel worker to help speed up the processing. This 8MB threshold can be configured by the min_parallel_table_scan_size parameter in postgresql.conf . There is another configuration parameter max_parallel_workers that controls the maximum number of parallel workers is allowed to be spawned. The default is 8.

Technically, I can avoid my visibility issues simply by either setting min_parallel_table_scan_size to a huge number, or setting max_parallel_workers to 0. But this is really not my style, I would like to keep all these goodies that PG provides while being able to solve the problem.

To spawn a parallel worker, the psql backend will initialize a parallel worker context in the global process table and a message queue based on shared memory for communication with the backend. Then it sends a signal to postmaster to notify that the global process table has been updated.

When postmaster receives the signal, it will load the global process table and found that it needs to spawn a new parallel worker. It will proceed to fork a new parallel worker according to the context information supplied. This information determines the entry point for the parallel worker and what to do once spawned. During processing, the parallel worker and the psql backend use the message queue to communicate tuples back and forth and finally the psql backend will gather together all the data tuples and produce a final result back to the user.

4. Can We Use GDB to attach This Parallel Worker’s PID When Spawned?

Technically yes, but the life time of this parallel worker may be very short, by the time you see its PID from the ps -ef command, the worker may have already done its job and exited. This means, it is too late for me to start GDB and attach to its PID.

Instead, the technique I am going to show you today will trace the parallel worker from the moment it starts.

5. Tracing the Parallel Worker

I will be using this instance of PostgreSQL server (version 12.5) as an example where PID 11976 is the psql backend process serving the psql client.

img

Pre-Condition:

Connect psql to the PostgreSQL server, create an example table and inserted about 2.5M rows of data. This will for sure trigger parallel workers.

$ psql -d postgres -U postgres -p 6660
psql (12.5)
Type "help" for help.

postgres=# create table test(a int, b int);
CREATE TABLE
postgres=# insert into test values(generate_series(1,500000),1);
INSERT 0 500000
postgres=# insert into test values(generate_series(1,500000),1);
INSERT 0 500000
postgres=# insert into test values(generate_series(1,500000),1);
INSERT 0 500000
postgres=# insert into test values(generate_series(1,500000),1);
INSERT 0 500000
postgres=# insert into test values(generate_series(1,500000),1);
INSERT 0 500000
postgres=#

Step 1: Attach GDB to the psql backend having PID = 11976 and Set a Break Point

I am setting a break point at the function RegisterDynamicBackgroundWorker. This is called when parallel worker is required to complete the query. Setting a breakpoint allows us more control as to when to proceed with a parallel worker spawn.

gdb postgres
(gdb) attach 11976
(gdb) b RegisterDynamicBackgroundWorker

Step 2: Attach GDB to the Postmaster having PID = 11959 and Set 2 Break Points

We are using a second GDB to attach to the postmaster and set 2 break points there. fork_process is the function before postmaster actually spawns a new parallel worker using the system fork() call. ParallelWorkerMain is the main function for the parallel worker after it has been spawned.

gdb postgres
(gdb) attach 11959
(gdb) b fork_process
(gdb) b ParallelWorkerMain

Step 3: Execute a Large SELECT Query On psql To Trigger the Break Points

postgres=# select count(*) from test;

The RegisterDynamicBackgroundWorker break point will be hit on the first GDB session having attached PID = 11959

Use the continue or c GDB command to continue to spawn the worker

Breakpoint 1, RegisterDynamicBackgroundWorker (worker=0x7ffd867f3c80, handle=0x55a009b77388) at bgworker.c:1002
1002 bool success = false;
(gdb) c
Continuing.

As you continue the first GDB session, the second GDB session will pause due to receipt of a SIGUSR1 signal. This signal tells postmaster to reload the global process table and then spawn a parallel worker. Using the continue command will hit the first break point at fork_process

Program received signal SIGUSR1, User defined signal 1.
0x00007f301b97d0f7 in __GI___select (nfds=5, readfds=0x7ffd867f47d0, writefds=0x0, exceptfds=0x0, timeout=0x7ffd867f4740)
at ../sysdeps/unix/sysv/linux/select.c:41
41 in ../sysdeps/unix/sysv/linux/select.c
(gdb) c
Continuing.

Breakpoint 1, fork_process () at fork_process.c:47
47 fflush(stdout);

(gdb)

Step 4: Tell Postmaster GDB To Follow Child Process Instead Of Parent

At this point, the postmaster GDB is now waiting at the fork_process call, which is right before spawning a parallel worker. This is a good time now to tell GDB to follow the child process instead of staying at parent when the process calls fork(). The reason we want to set this late at this moment is because postmaster is occasionally spawning other backend processes such as walsender and walreceiver. Setting to follow child process early may cause our GDB to follow to another backend process that we are not interested in.

(gdb) set follow-fork-mode child

You may use the continue command after setting it to follow child. Then immediately the GDB will switch to the new child process having PID = 12198 below and hit our second break point ParallelWorkerMain. So, Now the GDB is debugging the parallel worker process instead of the original postmaster.

(gdb) c
Continuing.
[New process 12198]
[Thread debugging using libthread_db enabled]
Using host libthread_db library "/lib/x86_64-linux-gnu/libthread_db.so.1".
[Switching to Thread 0x7f301ca79740 (LWP 12198)]

Thread 2.1 "postgres" hit Breakpoint 2, ParallelWorkerMain (main_arg=1544458234) at parallel.c:1207
1207 {

Step 5: Continue To Debug The Parallel Process

Using the ps -ef | grep postgres command, we can see a new parallel worker being spawned having PID = 12198

img

At this point, you are free to explore the process flow of the parallel worker. For me, I am debugging the visibility issues, so I will set additional break points at HeapTupleSatisfiesMVCC and TransactionIdIsCurrentTransactionId. In your case, you may be debugging some other functionalities.

Being able to debugging into a parallel worker with GDB allows me to see the problems I was having and being able to fix quickly.

If you are having trouble tracing into a parallel workers spawned by PostgreSQL during run time, I hope this blog will be helpful to you.

Your browser is out-of-date!

Update your browser to view this website correctly. Update my browser now

×