In my previous blog here, I discussed about PostgreSQL’s point in time recovery where PostgreSQL supports an ability to recover your database to a specific time, recovery point or transaction ID in the past but I did not discuss in detail the concept of timeline id, which is also important in database recovery.
2. What is timeline ID and Why it is important?
A timeline ID is basically a point of divergence in WAL. It represents a point, of to be exact, the LSN of the WAL in which the database starts to diverge. Divergence happens when an user performs a point in time recovery or when the standby server is promoted. The timeline ID is included in the first 8 bytes of WAL segment files under pg_wal/ directory.
For example: pg_wal/000000010000000000000001, indicates that this WAL segment belongs to timeline ID = 1
and
pg_wal/000000020000000000000001, indicates that this WAL segment belongs to timeline ID = 2
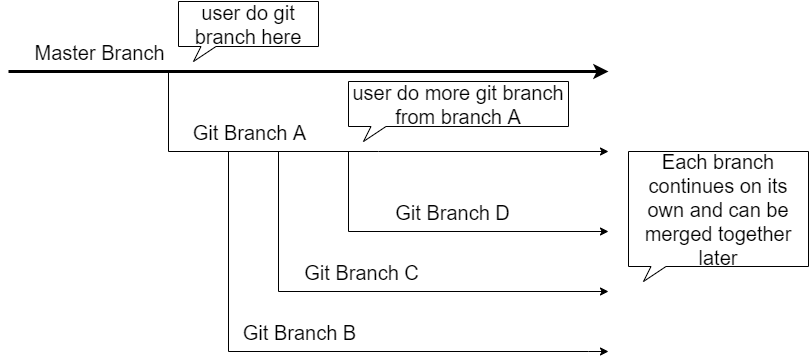
Timeline ID behaves somewhat like git branch function without the ability to move forward in parallel and to merge back to the master branch. Your development starts from a master branch, and you are able to create a new branch (A) from the master branch to continue a specific feature development. Let’s say the feature also involves several implementation approaches and you are able to create additional branches (B, C and D) to implement each approach.
This is a simple illustration of git branch:
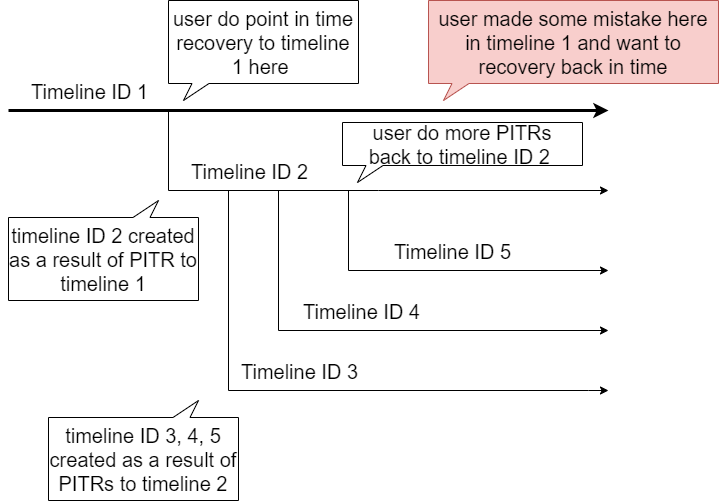
With timeline ID, your database starts from timeline ID 1 and it will stay at 1 for all subsequent database operations. Timeline ID 2 will be created when the user performs a point in time recovery on timeline 1 and all of the subsequnt database operations at this point belong to timeline ID 2. While at 2, the user could perform more PITR to create timeline 3, 4 and 5 respectively.
In the previous PITR blog, I mentioned that you could do PITR based on time, a recovery point, a LSN or a transaction ID but all these can only apply to one particular timeline. In postgresql.conf, you can select a desired recovery timeline by the recovery_target_timeline parameter. This parameter can be 'latest', 'current', or 'a particular timeline ID value'.
With this configuration, an user is able to recovery the database to a particular point of a particular timeline in the past
This is a simple illustration of timeline ID:
3. The History File Associated with a Timeline ID
The history files are created under pg_wal/ directory with a .history postfix when a new timeline Id is created. This file describes all the past divergence points that have to be replayed in order to reach the current timeline. Without this file, it is impossible to tell where a timeline comes from, thus not being able to do PITR.
For example, a history file 00000003.history may contain the following contents
cat pg_wal/00000003.history
1       0/30000D8       no recovery target specified

2       0/3002B08       no recovery target specified
which means that timeline 3 comes from LSN(0/3002B08) of timeline 2, which comes from LSN(0/30000D8) of timeline 1.
4. Importance of Continuous Archiving
With the concept of timeline ID, it is possible that the same LSN or the same WAL segments exist in multiple timelines.
For example: the WAL segments, 3, 4, 5, 6 exist in both timeline 1 and timeline 2 but with different contents. Since the current timeline is 2, so the ones in timeline 2 will continue to grow forward.
With more timelines created, the number of WAL segments files may also increase. Sine PG keeps a certain amount of WAL segment files before deleting them, it is super important to archive all the WAL segments to a separate location either by enabling continuous archiving function or using pg_receivewal tool. With all WAL segment files archived in a separate location, the user is able to perform successful point in time recovery to any timeline and any LSN.
Recently I have been practicing the internals of PostgreSQL continuous archiving and the point in time recovery features that are required for my current development work. Today I would like to demonstrate these important features with the recently released PostgreSQL 14 on Ubuntu 18.04.
2. Write Ahead Log?
Before going into the details of continuous archiving, it is important to understand the concept of Write Ahead Log (WAL). WAL files are generated by PG that contains all of the operations done on the database since the beginning. Operations such as INSERT, UPDATE, DELETE, VACUUM …etc are captured in WAL files. Having these WAL files, it is possible to recreate the database simply by replaying them, allowing an user to recover the database to a certain state in case of fault. This is the basis of continuous archiving and point in time recovery.
3. What is Continuous Archiving?
The generated WAL files are normally stored in the pg_wal directory within the PG database cluster, but they will not grow forever. The configuration parameters, max_wal_size and min_wal_size control how many WAL files can be kept in pg_wal directory. The checkpointer process will periodically purge the old WAL files, leaving only recent ones.
So, it is important to set up continuous archiving so all these WAL files can be archived to somewhere else outside of PG cluster. So, when you need all the old WAL files for recovery, PG can restore them from the archive.
To enable WAL archiving and restoring, set these parameters in postgresql.conf:
where you should replace /path/to/archive with your own archive path on your system. %p and %f will be swapped with path to WAL segment and WAL segment name to complete the command.
When a WAL segment is ready to be archived, PG will create a signal file in pg_wal/archive_status to indicate a particular WAL segment is ready for archive.
In the example below, the segment 00000001000000000000000E is ready for archive, indicated by the postfix .ready while all of the previous segments have been successfully archived and therefore indicated by the .done postfix.
In the next checkpoint, these .done files will be removed so these status files will not be continuously growing as well.
4. What is Point In Time Recovery (PITR)?
Having all of the WAL segments backed up in a separate archive, we gained the ability to recovery the database up yo a certain point in time in the past or completely recover the whole database. This depends on your use case, if you made a major mistake and need to start again from a point of time in the past, you can have PG to recover to that particular time during recovery mode and continue the database operation from that point. This is also referred to as switching to a new time line ID and we will discuss this more in the next blog.
Let’s continue from the above example (which already has 1 million rows of data) and do a point in time recovery.
Make a basebackup of the current database, we can use pg_basebackup to achieve this
back to the database and continue inserting some more data, use pg_switch_wal to immediate write out the WAL segment and obtain a LSN. LSN stands for Log Sequence Number, and it logically represent a WAL entry within a WAL segment. Refer to documentation here for more information.
After obtaining the LSN, we again insert some more rows of data.
insert into test values(generate_series(1,1000000), 'asdas'); insert into test values(generate_series(1,1000000), 'asdas');
insert into test values(generate_series(1,1000000), 'asdas'); insert into test values(generate_series(1,1000000), 'asdas');
So, in total, this table test should have 5 million rows of data, because it started with 1 million and we just inserted 4 million more in the example above.
The WAL location indicated by LSN 0/13DAC308 indicated a time when the database only contains 3 million rows, and this is the point of time that we would like to recover up to in our example.
Stop the database server
pg_ctl -D pgtest stop
Wipe out everything in this database pgtest
$ rm -rf pgtest/
I know it sounds crazy, but remember, we made a basebackup back in (1.) + all the WAL segments in the archive, so technically we still have everything.
Copy everything from our basebackup back to pgtest
cp -r pgtest-back/* pgtest/
Edit pgtest/postgresql.conf and set your recover target
Since we are using LSN as our target, we can simply put the LSN we captured to recovery_target_lsn configuration
recovery_target_lsn = '0/13DAC308'
PG also supports other ways to define recovery target, based on timestamp, name or xid. Refer to this documentation for other options.
Signal the database to run in recovery mode by creating a recovery.signal file under the pgtest cluster
$touch pgtest/recovery.signal
Start the server
$pg_ctl -D pgtest start
the server will now start in recovery mode and it will restore WAL files from the archive and perform the recover. You may log in with psql and check that the database should contain also 3 million rows instead of 5.
You may notice that even though the database has been recovered to a point of time in the past, you will encounter a database in recovery or read only database error if you intend to insert additional data. This is because we are still in the recovery mode but is currently paused.
This is configured by the recovery_target_action option, which defaults to pause. This is actually intended, to allow you to have a moment to check your database and confirm that it is indeed the database state that you would like to recover to. If this is wrong, you can simply shutdown the database and reconfigure the recovery_target_lsn until you reach a desired state of database.
Exit the recovery mode Once you are confirm the database is recovered correctly, you can exit the recovery mode by this psql command:
select pg_wal_replay_resume();
This command will end the recovery mode and you should be able to insert additional data to the database. The recovery.signal file will be removed, and the future WAL segments will have a new timeline ID.
Timeline ID is also an important aspect of the recovery and we will discuss more on timeline ID in my next post.